Wednesday, July 24, 2019
Cinnamon Tea Cake in honour of Margaret Fulton
Today is a sad day for Australian cooks, as the great Margaret Fulton passed away today at the age of 94. Margaret is legendary in Australia, and many people grew up with their mothers cooking her recipes, or owning her cookbooks themselves. My mother received the first edition of The Margaret Fulton Cookbook for her 21st birthday, and she still uses it, albeit it long ago having lost its cover and numerous pages hanging by a thread from the binding.
I bought the revised and updated edition of The Margaret Fulton Cookbook when it was first issued in 2004, when I was living in Sydney. It was the first new cookbook I had ever bought, and I felt very proud to own it because I now had the same cookbook as my Mum. The first recipe I made from it was Margaret's cupcakes, which I made and took to work iced with green icing, and a jaunty spearmint leaf lolly on top of each for St Patrick's Day. I did not tell anyone that I made them, and I remember my then boss coming in to show me one, quite amused. (I did not let on that I had made them!)
I have made a number of different Margaret Fulton recipes over the years. The Beatles birthday cake is probably my favourite because it is so fun - I saw the recipe in an exhibition of Beatles memorabilia and scoured the Internet to find it. However, there are Aussie staples like Anzac biscuits and lemon delicious, as well as plenty of Christmas recipes.
In 2012, I even saw a musical called Margaret Fulton: Queen of Desserts, celebrating Margaret's life and work. There was audience participation involved in the form of being handed mini Australian flags and being required to wave them at the right time.
I thought it only fitting that I celebrate Margaret's life on this sad day by baking one of her recipes from the original and still the best, The Margaret Fulton Cookbook. In keeping with Margaret's mission to make cooking accessible to all, I decided to make a very simple cake - the Cinnamon Tea Cake. Her book marks the recipes with dots in the heading so you know at a glance how complex or not they are to make, and the Cinnamon Tea Cake is indicated to be easy by a single dot.
While this cake is simple to make, it is not at all skimpy on flavour. It is light and buttery, and given a spicy, crunchy boost with a sprinkle of cinnamon and sugar on top. Served fresh out of the oven while it is still warm, it is absolutely heavenly. It was very hard to limit myself to one slice.
To make your very own Cinnamon Tea Cake according to Margaret's recipe, you will need:
1 egg, separated
1/2 cup sugar
1/2 cup milk
1/2 teaspoon vanilla extract
1 cup self-raising flour
30g melted butter
For the topping:
2 teaspoons melted butter
1 tablespoon sugar
1/2 teaspoon cinnamon
Preheat your oven to 190 degrees Celsius. Grease and line a 20cm round cake tin.
Beat the egg white until stiff peaks form, then beat in the egg yolk.
Gradually beat in the sugar. Combine the milk and vanilla extract in a cup, then slowly beat it into the egg mixture.
Using a rubber spatula, fold the flour and melted butter into the cake batter.
Scrape the cake batter into the prepared tin and bake for 20-25 minutes until cooked through and golden on top.
Mix the sugar and cinnamon from the topping ingredients together.
Immediately on removing the cake from the oven, brush the top of the cake with the melted butter from the topping ingredients, and sprinkle over the combined sugar and cinnamon.
Turn the cake onto a wire rack, right side up. Serve warm or cooled.
Friday, December 4, 2009
Fruit mince, Margaret Fulton style
Traditional nursery rhyme
One of the building blocks for many traditional Christmas goodies is fruit mince. As a child, I hated fruit mince, because of its rather dense, slightly cloying texture, and of course, it usually contains citrus zest - a big ewww ingredient for a child!
However, I am now more "mature" in my tastes - I drink red wine, I eat blue cheese, and I am happy to have the sharpness of citrus zest in my food. Happily, this also means that at Christmas, I can indulge in treats such as fruit mince pies.
I've never made my own fruit mince or fruit mince pies before, so this is a new adventure for me. There are literally hundreds of different recipes for fruit mince, as with every other Christmas treat, so to tone down the noise, I went straight to a recipe by Australia's original doyenne of home cooking, Margaret Fulton. This recipe is in Margaret's Fulton's Christmas, printed last year, and can also be found in the Australian Good Food Christmas Baking supplement with the December issue of Australian Good Food magazine, presumably because Suzanne Gibbs, Margaret's daughter, co-wrote the book and is a staff writer for Australian Good Food. There are no plums in Margaret's recipe, so Jack Horner will have to amuse himself in other ways.
Margaret's recipe makes a whopping nine cups of fruit mince; I scaled it down to two thirds. However, the original recipe in all its glory is as follows:
500g raisins
500g currants
500g sultanas
120g chopped blanched almonds
2 peeled, cored and grated Granny Smith apples
330g packed brown sugar
150g melted butter
185ml brandy or rum
1 teaspoon mixed spice
grated zest and juice of 2 oranges
Process the fruit and almonds together in a food processor until coarsely chopped. You may have to do this in batches, depending on the size and horse-power of your food processor, and depending on whether you make the full recipe.
Put the chopped fruit and nuts into a bowl, add the remaining ingredients, and stir well to combine.
Cover the fruit mince and chill for at least 2 days before using, stirring daily. You'll be surprised at how it sucks up all the liquid and becomes quite dense! The fruit mince will keep for several months stored in an airtight container in the refrigerator (if it lasts that long!).
On the weekend, I will be making some goodies for our work bake sale using the fruit mince. I will post about these soon.
Saturday, September 20, 2014
Margaret Fulton's Beatles Cake and The Meaning of Life
1/3 cup hot water 2 ¾ cups plain flour 3 teaspoons baking powder ¼ teaspoon salt175g butter 3 eggs ½ teaspoon vanilla extract
Sift the flour, salt and baking powder into a bowl and set aside.
125g butter
50g sugar 1 egg yolk 1 cup plain flour 1 cup self raising flour pinch of salt iced waterblack licorice straps for hair and eyescashews for Ringo's noseunsalted peanuts for other nosesglace cherries for mouths
Preheat your oven to 190 degrees Celsius, and line a baking tray with baking paper.
Beat the softened butter and sugar together in a stand mixer until light and fluffy, then beat in the egg yolk.
Using a spoon, fold both flours and the salt into the butter mixture. Add iced water to the dough and knead in if necessary to make firm dough. (I did add some water.) Form the dough into a flat disc, wrap it in cling film, and allow it to chill in the fridge for 30 minutes.
Roll the chilled dough out on a floured surface or between two pieces of baking paper until 1/4" thick. Using a paper or plastic template as a guide, cut out the Beatle heads from the dough with a small sharp knife. (Cut out 12 head shapes.) Put the biscuits on to the lined biscuit tray and chill in the fridge for 30 minutes.
Remove the chilled biscuits from the fridge and bake in the preheated oven 8-10 minutes or until pale golden colour. Allow to cool on the tray for 5 minutes before transferring the biscuits to a wire rack to cool completely.
Cut out hair and eyes from the licorice straps, and mouths from the glace cherries, then stick these and the nut "noses" onto the biscuits with a small amount of chocolate icing (see below).
Makes 12 Beatles. (I only made the four biscuits I needed for the cake - that was more than enough!)
Tuesday, April 18, 2017
TWD - ANZAC Biscuits
This week's Dorie's Cookies recipe comes from my own backyard - ANZAC Biscuits. Most Aussie kids grow up with ANZAC biscuits in the bikky tin, and I loved (and still love) my mum's version.
I have made Anzacs myself a number of times over the years. The first time was a bit of a disaster, but things got better after that. The first Anzacs recorded on my blog were in 2008 using the same recipe as my mum (a la Margaret Fulton) in my South Yarra kitchen; since then, on my return to Melbourne, I made some healthy ones in 2012 (meh); and these in 2013 from my high school home ec cookbook.
Dorie's ANZAC biscuits are a little more L M Downes than Margaret Fulton; much more oatmeal cookie-esque than the Margaret Fulton ones that I am used to. They are still tasty and smell good. However, mum's Anzacs win hands down.
Dorie said that these biscuits would spread a lot, but mine didn't spread much at all. I also think that I would add back the 1/2 cup of sugar that Dorie took out; sweetened coconut is not common here, and as I used unsweetened coconut, I missed that extra sweetness that I associate with Anzacs.
ANZAC Day is not until 25 April, but for Dorie, I am making these biscuits early this year.
To see what cookies the others made this week and what they thought about it, visit the LYL section of the TWD website.
Thursday, December 11, 2014
Margaret Fulton's Rich Christmas Pudding
It's scarily close to Christmas now. I hope that your preparations are going well for the big day. Back in October, I commenced my Christmas preparations by making a Christmas cake and a Christmas pudding. For this year's pudding, I chose Margaret Fulton's Rich Christmas Pudding from Margaret Fulton Christmas. You can also find the recipe online here.
Christmas pudding is my favourite part of the Christmas day meal. We always have it with lashings of warm custard and vanilla icecream. No matter how full I am from the main meal, there is always room for Christmas pudding.
I liked this pudding recipe because it didn't require heaps of expensive glace fruits - just sultanas, currants, raisins and mixed peel. It also turned out really well, even though I only had time to steam it for 5 hours instead of 6.
I will shortly be slicing up my pudding for Christmas gift boxes. I am hoping that there is some left over for me to try!
Sunday, December 2, 2012
CW Cakes Black and White Cupcakes Class
Yesterday, I attended another cupcake decorating class, this time at CW Cakes in Malvern. I had no expectations as to what this class would be like, as I bought the class through a voucher site that didn't describe the class.
Our friendly instructor, Ella, introduced the 2 hour class as the Black and White Cupcakes course, and our decorating medium was to be black and white fondant.
Although I had already done a fondant decorating class this year, the CW Cake course was different again, and I learned some new techniques - namely, stencilling and the use of moulds.
The first cupcake is the "Chanel" handbag:
This was made by simply imprinting the fondant with an upholstery type design, cutting out the disc, then attaching two black fondant "C"s in a mock-up of the Chanel logo and attaching three little lustre dusted fondant balls of various sizes. The disc was attached to the top of the cake using sugar glue, and the decorations were then attached to the top of the cake in the same way.
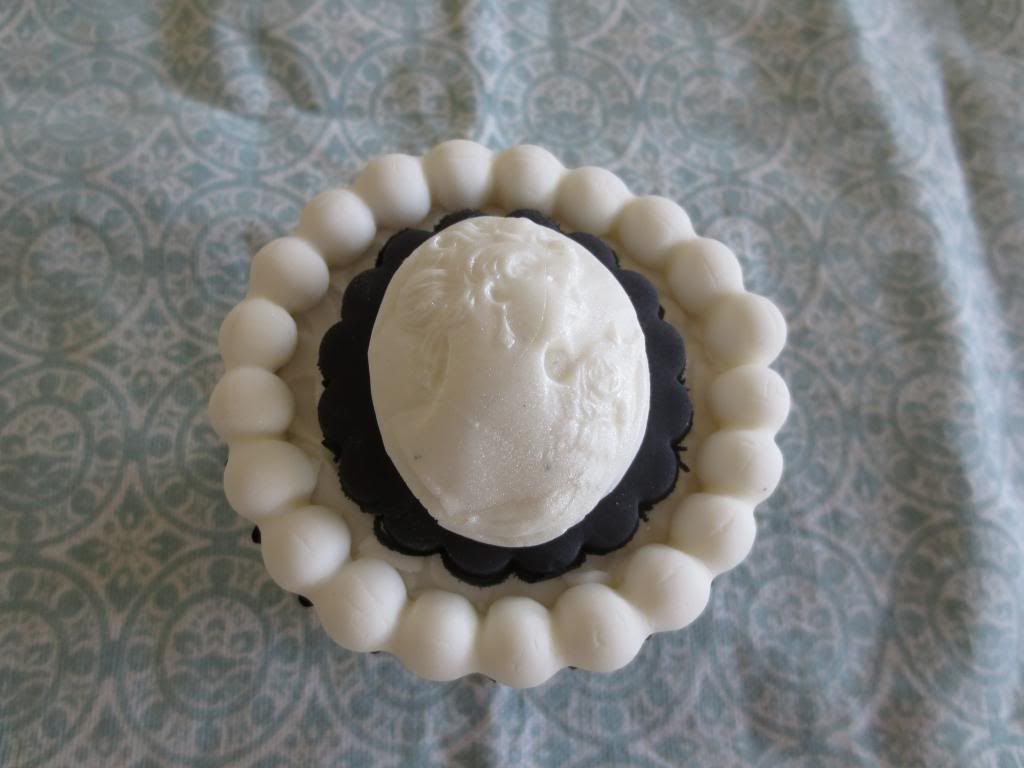
The next design was the cameo brooch:
This involved placing an imprinted disc of fondant on the top of the cake, lustre-dusting it using a large make-up style brush, adding a scalloped black fondant circle, and making a cameo brooch by pressing fondant into a silicone mould, popping it out then lustre dusting it before attaching it to the top of the cake. The pearls around the edge of the cake were made by pushing a rolled sausage of fondant into a pearl mould, then using a knife to cut off the excess. This was my least favourite design because I think it looks kind of clunky, and there is no way that I would personally want to eat that much fondant.
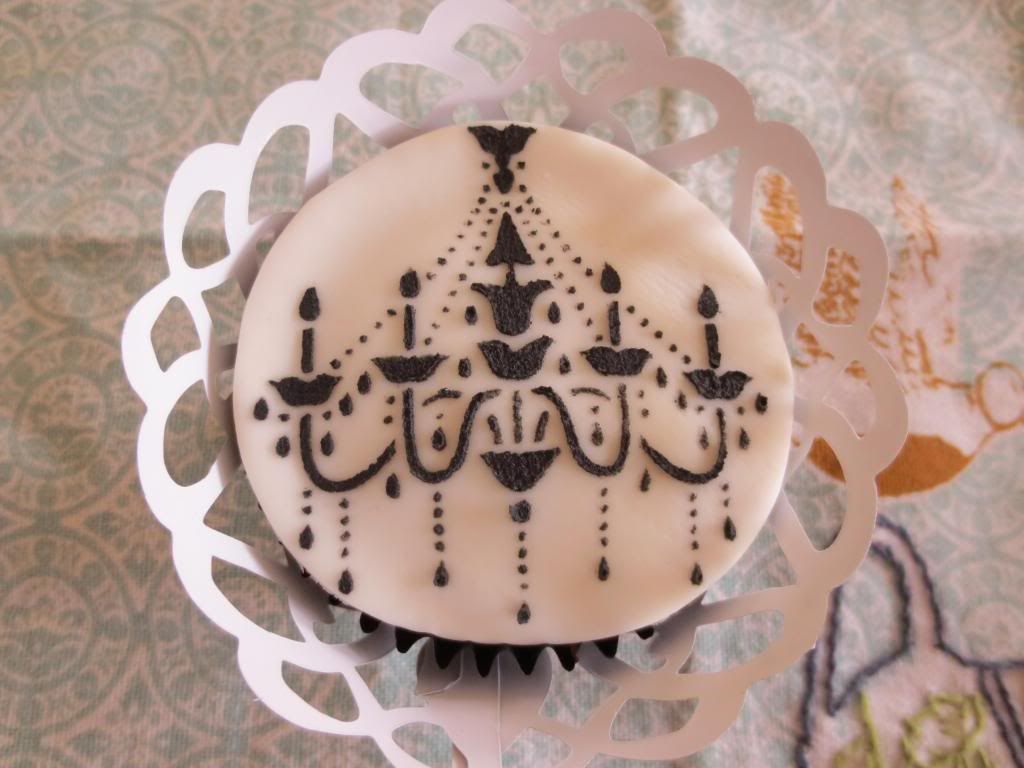
One of my favourite designs was the stencilled chandelier:
This was made by rolling out the fondant to 2.5-5mm thick, pressing a stencil firmly onto the top of the fondant, covering the stencil with very thick black royal icing, scraping off the excess with a plastic spatula, then carefully lifting up the stencil.
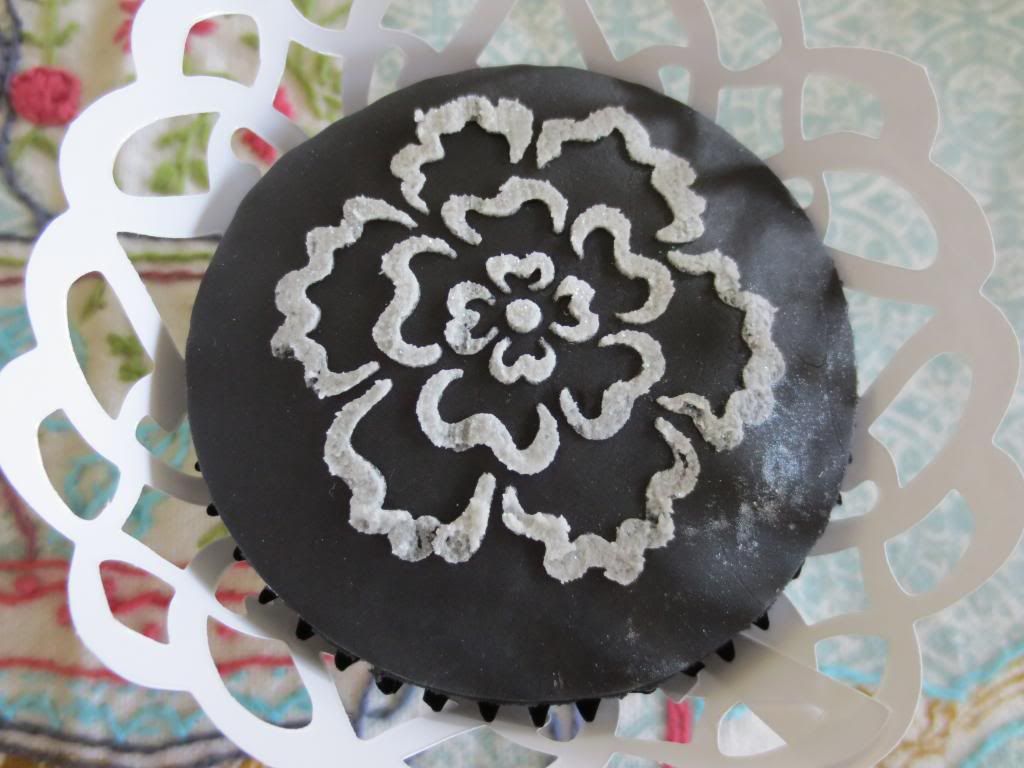
This one was made similarly, except that edible glitter was sprinkled over the stencil design before lifting off the stencil:
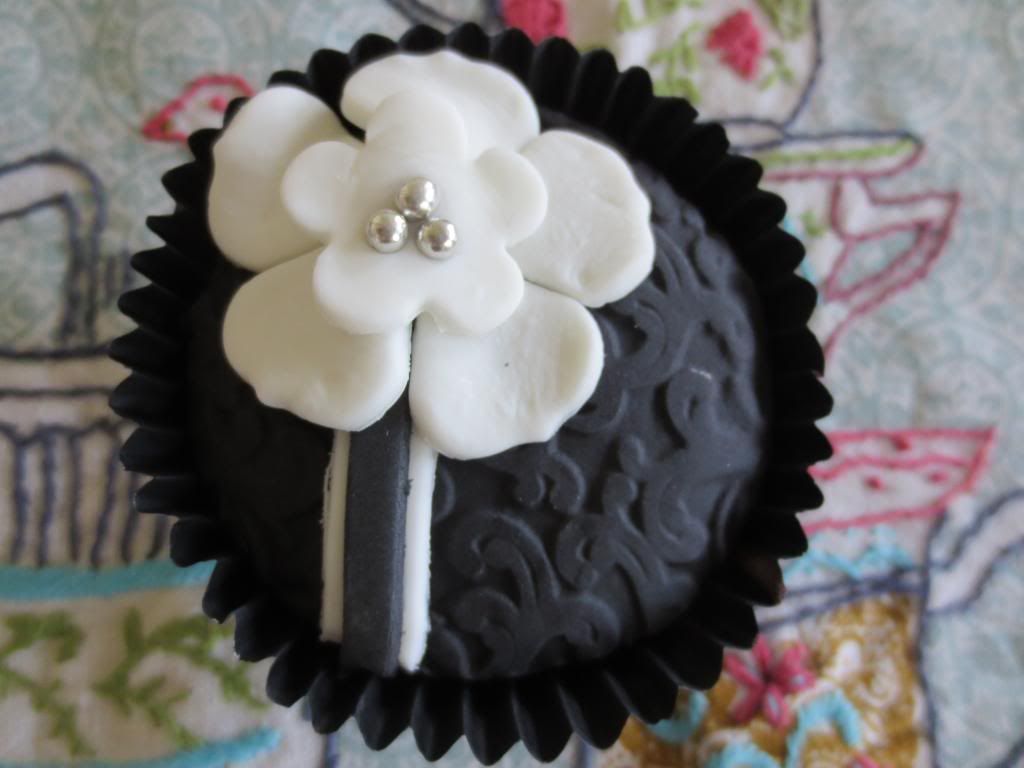
Our next design involved an imprinted black fondant disc, two fondant ribbons cut using a ribbon tool to create an off-centre sash, and using two different sizes of flower cutters to create the flower, with silver cachous to form the centre of the flower:
Once again, everything was attached using sugar glue. I also filled this cake using white buttercream piped into the cake using a Wilton 230 piping tip.
Finally, we made my favourite design:
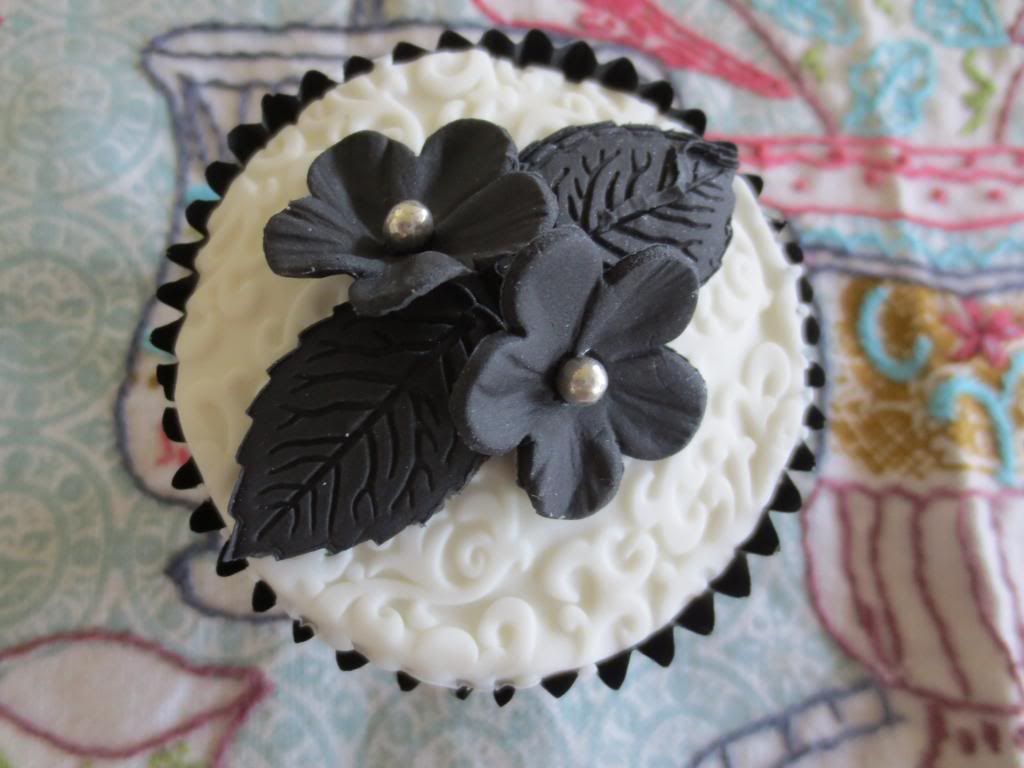
This involved an imprinted fondant disc, to which was attached two fondant leaves made using a plunger cutter and two fondant flowers which were pressed into a hibiscus mould to give them a more life-like appearance, with silver cachous attached to form the centres.
My other cupcake classes this year were at Whimsical Cakehouse (fondant) and Crabapple Bakery (buttercream). I think that the most elegant cupcakes are achieved using fondant, although the buttercream ones are tastier. I liked a number of designs from both Whimsical and CW Cakes, but the cake preparation taught at Whimsical, by cutting and ganaching the cake before decorating, gives a superior end product, although time consuming to do.
I like that the techniques taught aat the fondant classes are very easy to replicate at home, and I already own a number of the tools required. Other tools, such as the ribbon cutter, are not necessary, as the same result can be easily achieved with a knife, and good old fashioned water or sugar syrup works just as well as sugar glue. If I am ever called upon to make special occasion cupcakes, I know I have learned enough decorating techniques to make some elegant yet simple cakes.
Last night, to top off a very food orientated day, I went to see Margaret Fulton - Queen of the Dessert (A Musical) at Theatreworks in St Kilda. It was lots of fun - I had no idea what to expect, but in the end loved it. Being a Margaret Fulton fan made the experience even more special - my first cookbook was the Margaret Fulton Cookbook. The performance also offered a chance for some celebrity spotting, as Eddie Perfect from Offspring, among other achievements, was in the audience.
Monday, December 24, 2012
Fruit mince pies
Remember my Betty's of Harrogate fruit mince? Well, I put it to good use in my Christmas boxes this year by making fruit mince pies.
To make my pies, I used Margaret Fulton's recipe for the pastry, from Margaret Fulton Christmas, and available online here. The pies are filled with two teaspoons of fruit mince. The fruit mince is quite rich, so that is quite enough.
i was very happy with the pies - Margaret's pastry is a little more robust than the very short recipe I have used in the past, so it can be packaged easily, but still tastes buttery and good.
As for my fruitcake, I iced it with rolled fondant, sliced it into squares, and decorated each slice with a sugar Christmas decoration:
And finally, if you were wondering what my Christmas pudding looks like inside, here it is:
Friday, August 7, 2015
Margaret Fulton's Lemon Delicious
Lemon delicious pudding is a staple in many Australian households. It apparently used to be served quite often as a dessert course to the Sunday roast, as when people started up their old wood-fired ovens, they wanted to make the most of it.
My Mum often made lemon delicious when I was growing up, and it is one of my favourite desserts. She usually served it with warm custard. Delish!
Mum uses Margaret Fulton's recipe for lemon delicious, which I have also used. You will find the recipe online here.
On a cold winter's night, what could be better than a warm lemony pudding with sponge on the top and lemon sauce underneath. If you have never tried lemon delicious, I highly recommend giving Margaret's recipe a go.
Friday, June 15, 2007
Profiteroles with champagne custard
I chose to fill my profiteroles with champagne flavoured pastry cream (custard). The recipe is here, from Cheryl of Cupcake Bakeshop. This custard has a subtle "zing" from the champagne/sparkling wine used to flavour it, and makes a refreshing change from your usual pastry cream.
The recipe for the choux pastry that I used is Pierre Herme's recipe from p527 of The Cook's Book. However, I prepared the choux buns from the pastry using the directions from p194 of The Margaret Fulton Cookbook. My completed buns were not as attractive as Pierre Herme's or Margaret Fulton's, but they tasted perfectly fine!
Once the pastry cream and choux buns were cool, I filled the hollow in the buns with the pastry cream and iced them with chocolate icing to complete the profiteroles. I chose to ice the profiteroles rather than use chocolate sauce because it made them more readily transportable. I ended up with 18 profiteroles.
The verdict - yum! I think my work colleagues agreed - there were only 2 left at the end of the day. I am also no longer afraid of choux pastry, and would happily try it again for a special occasion.
Friday, December 18, 2009
White Christmas
An easy treat that you can make for Christmas is White Christmas. It's like an albino chocolate crackle without the chocolate and containing fruit. Kids like it because it is easy to make, looks pretty and is sweet. Adults with a sweet tooth like it because - well, they just do. White Christmas is not one of my favourite treats any more, but I can remember loving it as a child.
The recipe for White Christmas is usually printed on the side of the Rice Bubbles packet. However, in case you don't have access to that recipe, here is Margaret Fulton's version from Margaret Fulton's Christmas, which sounds pretty much like the original:
2 cups rice puff cereal (eg Rice Bubbles)
1 cup dessicated coconut
1 cup dried milk powder
1 cup icing sugar
1/2 cup raisins
1/2 cup currants (I substituted sultanas)
1/2 cup halved glace cherries
250g vegetable shortening (eg Copha)
Line a 18 x 28cm slice pan with baking paper.
In a large bowl, mix together all of the ingredients except the Copha.
Melt the vegetable shortening in a saucepan over low heat, then pour onto the other ingredients and stir well to combine. Spread the mixture evenly in the slice pan, and press down the top with a spoon. Refrigerate the White Christmas for 2 hours until set, then cut into squares of the desired size.
If you don't like the dried fruits suggested, you can leave them out or substitute other dried fruits. Just have fun with it!
Tuesday, July 27, 2010
Daring Bakers - Swiss Swirl Icecream Cake
I am typing this at the airport while waiting for my flight home, having spent the weekend with my interstate-based family. A visit home is especially poignant at the moment, as both my mother and the family dog have in the last three months had operations to deal with the same dreaded disease. Mum is also enduring some ongoing treatment, which has knocked her about a fair bit in recent weeks, so it was lovely to see her and touch her in person. The dog is behaving as though nothing ever happened, despite the large gash on his back sewn up with stitches that make him look like a Tatty Teddy. He is lively and frisky, and doesn't seem at all bothered by his recent operation. His stitches come out tomorrow.
Because I had heavy commitments with the writing project I have mentioned previously, and I knew that I was having a weekend totally away from it all, I was ultra-organised with Daring Bakers this month, and got it done early on. However, it came at a price, Ugarte - I was so engrossed in the final assembly that I didn't notice that the washing machine drain pipe had managed to work its way out with vibration, and by the time I noticed, I had a stream flowing in my carpeted living room. Needless to say, this was not cheap to fix, and as it happened on a Saturday morning, I was lucky indeed to get hold of a carpet technician who was able to squeeze me in and sop up (or suck up!) the water. The offending hose pipe has now been taped into place with PVC tape, as this is an exercise that I do not want to repeat.
The July 2010 Daring Bakers’ challenge was hosted by Sunita of Sunita’s world – life and food. Sunita challenged everyone to make an ice-cream filled Swiss roll that’s then used to make a bombe with hot fudge. Her recipe is based on an ice cream cake recipe from Taste of Home.
Sunita gave us some leeway with this challenge, in that provided we made each component (swiss roll, roll filling, two icecreams and an icecream sauce) from scratch, we did not have to use the recipes she provided.I decided, in a rare departure, to make everything using my own recipes. I made a vanilla swiss roll from The Margaret Fulton Cookbook, a raspberry cream cheese filling, David Lebovitz's vanilla bean icecream and raspberry (in my case, mixed berry) icecream, and a mixed berry sauce inspired by Steve Manfredi.
Here is a far more flattering perspective after it has been rolled up, showing the pretty pink filling:
Margaret Fulton's recipe, which makes one swiss roll, is as follows:
1/2 cup self raising flour
pinch of salt
3 eggs
1/2 cup sugar
1 tablespoon hot water
extra sugar for dredging
Preheat your oven to 220 degrees Celsius. Spray a 30cm x 25cm swiss roll pan with cooking oil, and line with baking paper.
Sprinkle a flattened out tea towel with sugar ready for turning out the baked cake.
Sift the flour and salt together. In a separate heat-proof bowl standing over a saucepan of gently simmering water, whisk the eggs and sugar together until thick and creamy.
Remove the bowl from the heat and continue to whisk the mixture until cool. Fold in the flour, then the hot water. Pour the batter into the prepared pan and spread out evenly.
Bake the swiss roll for 7-10 minutes, until pale golden and springy.
Turn the cake out immediately onto the sugared tea towel, peel off the paper lining (carefully - the cake is fragile!), and cut off the crisp edges of the cake with a knife. Roll the hot cake up in the sugared tea towel, from one short end towards the other, and allow the cake to cool in the tea towel.
Once the cake is cool, unroll it and spread it with the raspberry cream cheese filling. The filling is comprised of 65g cream cheese, 1/4 cup icing sugar, and 2 tablespoons raspberry jam, blended together until smooth.
Here is my vanilla bean icecream being churned - the recipe is here (I only made half):
This is my favourite icecream ever - it is delicious!!! When this icecream is softened, it is spread in a layer over the cake before freezing again:

Next, I made a mixed berry sauce from this recipe, and mixed berry icecream using this David Lebovitz recipe:
Doesn't this sauce look great!
A layer of sauce is spread over the vanilla icecream layer, then the dessert is frozen for an hour or so before the rest of the cavity is filled with softened berry icecream:
I also closed off my bombe with more slices of swiss roll.
After freezing for around 4 hours, the completed bombe is turned out:
The next photograph clearly shows all layers - and how delicious this is:
Thanks to Sunita for hosting us this month. You can check out the original recipe at her site, and check out all the wonderful variations on the bombe at The Daring Bakers blogroll.
Saturday, June 28, 2014
Jelly Roll for the Picnic Game
Louise of Months of Edible Celebrations is hosting The Picnic Game for International Picnic Day. What is the Picnic Game? Check out Louise's post here to find out.
I am going on picnic, and I am bringing:
A - Angel Food Cake
J - Jelly Roll
It's not just any old jelly roll - this recipe comes from Margaret Fulton, doyenne of the Australian kitchen, from p 215 of The Margaret Fulton Cookbook. This book is the very first cookbook that I bought, 10 years ago, and is an updated version of the one that my mother received for her 21st birthday, so it is pretty special to me.
If you want make this jelly roll, you will need:
110g self raising flour
pinch salt
3 eggs
115g white sugar, plus extra for sprinkling
1 tablespoon hot water
3-4 tablespoons jelly of your choice
Preheat your oven to 220 degrees Celsius. Grease a 30 × 25 cm jelly roll tin and line with greased baking paper.
Sift the flour and salt together.
Put the eggs and sugar into a heatproof bowl over a saucepan of simmering water, and whisk together for about 10 minutes or until mixture is very thick and creamy, or if using an electric mixer, until the eggs and sugar are just warm.
Remove the bowl from the water and continue whisking or beating the batter with a mixer until cool. Fold the flour gently into the batter, then fold in the hot water.
Pour the batter into the prepared jelly roll tin, and spread evenly over the base of the tin using a metal spatula.
Bake the cake in the preheated oven for 7–10 minutes or until pale golden and springy.
Turn the hot cake immediately onto a tea towel sprinkled with sugar. Carefully pull off the baking paper so as to avoid tearing. Cut off the crisp edges of the cake with a knife, then roll the cake up in the towel, and leave to cool.
Unroll the cake, and spread it with the warmed jelly to the edges of the cake. Using the tea towel to help, roll the cake into a firm roll.
Place the roll onto a wire rack with join underneath to cool. Sprinkle with more sugar before serving, if desired.
Please come along to the picnic - Louise has posted the entire Picnic Game roundup here.
Sunday, December 23, 2012
Gingerbread decorated with stencilled fondant
One of the staple treats of Christmas in many countries is the spiced cookie. Accordingly, I felt that I had to have at least one type of spiced cookie in my Christmas boxes again this year. The natural choice for me was gingerbread.
I decided to use Margaret Fulton's gingerbread men recipe from Margaret Fulton Christmas, which you can also find online here. However, instead of gingerbread men, I cut my gingerbread into discs that I could decorate. Inspired by my CW Cakes cupcake decorating course, I wanted to use the technique of stencilling fondant to decorate my gingerbread cookies.
I bought these stencils and Bakels white and chocolate fondant, and made my own royal icing and made some of it very thick and slurry-like and tinted green, while I left the rest white and of a thinner consistency.
To decorate the cookies, I rolled out pieces of fondant just large enough to cover a cookie. I then pressed the stencil down over the icing firmly, then using a thick paint brush, dabbed the green royal icing over the stencil. Using a straight edged pastry scraper, I removed the excess icing from the stencil. Next, I sprinkled gold edible disco glitter over the wet royal icing by tapping a glitter laden brush over the top of the icing, then carefully lifted the stencil. I then let the icing set a little.
I used the same cookie cutter that I used to make the cookies to cut out rounds of stencilled fondant. Using a spatula, I spread the thinner white royal icing onto a cookie, then carefully placed the fondant disc over the icing and tamped down the edges carefully. Voila!
I had some good feedback on these cookies, independently by two recipients, so I was pleased. These cookies were definitely the most fun thing to make out of this year's Christmas boxes, and they allowed me to show off my new stencilling skill.
Tips: Scrape off as much icing as possible from the stencil between cookies, as the icing dries and clogs up the stencil. Keep your icing well covered (fondant and royal icing) to stop it from drying out.