Friday, December 31, 2010

No FFwD today


Good morning to all. There is no FFwD from me today, as I am on vacation, miles from Around My French Table.

I hope that you are enjoying the holidays as much as Fred the miniature fox terrier. Happy New Year!

Thursday, December 30, 2010

Coin Laundry, Armadale


Just before Christmas, I went for brunch with my friends Craig, Steve, Veronica and Christian to a cafe called Coin Laundry in Armadale. It is tucked just behind Armadale Station. As the name suggests, the building housing the cafe used to be a coin laundry, and has been converted into a popular local cafe.

Inside, the cafe is light, bright and open, with fabric details on the walls and ceiling as decoration:


The breakfast menu sounded fabulous, and I could have eaten anything on it. There is something for everyone - bread, fruit, cereal, beans and, for the die hard carnivore, a fry up.

I chose the poached fruits with goats milk yoghurt and honey caramel ($11.50):


I was not all that keen on the texture of the yoghurt, and there was definitely more yoghurt than fruit, but it all tasted terrific as a combination. The slightly tangy flavour of the yoghurt was balanced by the sweetness of the caramel and the smooth coolness of the poached pear and rhubarb.

Other dishes that my friends sampled included a bircher muesli with coconut and passionfruit (~$9), a bean cassoulet with green olive tapenade (~$12), a champagne ham and cheddar foccaccia (~$9) and the Coin Laundry breakfast (~$16) - that is, a fry up, with exceptionally crispy bacon, eggs, bread and all the usual trimmings. (No black pudding though - in Australia, fry ups rarely come with black pudding.)

The service was efficient and friendly, and my friends already had a table when I arrived.

I would definitely go back to the Coin Laundry - it's a great newish venue for a casual meeting with friend.

Coin Laundry Cafe
61A Armadale Street
Armadale VIC 3143
Ph: 03 9500 1888

Tuesday, December 28, 2010

Cheese and walnut shortbread


Good morning! How are you? Hope you had a wonderful Christmas, and that Santa was kind to you.

It is officially Tuesday with Dorie today, but as it is a rewind (ie make what you want from recipes that have already been chosen), and I am on holidays, I am posting something totally different instead.

The last new recipe for this year from my Christmas boxes is for Cheese and Walnut Shortbreads, from p254 of Margaret Fulton's Christmas. These little biscuits are spiced with paprika and packed with cheddar and Parmesan, so they are a great snack at any time, not just for Christmas. They'd also make great nibblies at your New Year's Eve party.

To make these shortbreads, you will need:

185g cold butter, chopped into 1cm cubes
1 1/2cups finely grated Cheddar cheese
1/4 cup grated Parmesan cheese
1 1/2 cups plain flour, sifted
1 teaspoon paprika
1 teaspoon salt
2 tablespoons finely chopped walnuts


Put the flour, paprika and salt into the bowl of a food processor and pulse a couple of times to mix. Add the butter and cheeses to the bowl of the processor, and blitz for 20 seconds or until the dough clings together and forms a ball. (I needed to add more flour to achieve this.) Turn the dough out onto a lightly floured bench and knead it until it just comes together.

Divide the dough into two, press each piece into a flat disc with your hands, and wrap in cling film. Refrigerate the dough for an hour before use.

When you are ready to bake, preheat your oven to 180 degrees Celsius, and line 2 baking trays with baking paper or silicone mats.

Roll the dough out to 2-3mm thick and cut into stars with a star shaped biscuit cutter. Place the stars onto the lined baking trays, ~2cm apart. Continue until all the dough has been used.

Bake each tray of biscuits for 12-15 minutes or until golden in colour. Cool the biscuits completely on their trays before storing in an air-tight container.

These biscuits were just one feature of my Christmas boxes. Here is a plate arranged with the contents of a box: from top left, there is fruit cake, cucidata, rocky road, shortbread stars, plum pudding, rum ball, fruit mince tart and apricot ball. (I have posted the recipes for the other items in previous years - select the Christmas label on my side bar if you are interested.) I also added some of Dorie's cocktail nuts and some salted caramels:


I bought pretty Christmas themed boxes, and wrapped all the food in cellophane before placing in the box:


and tying the box shut with ribbon and adding a gift tag:


I think that I would be pretty happy if someone gave me this for Christmas. It looks delicious to me!

Hope that you are enjoying a break over Christmas with your loved ones.

Saturday, December 25, 2010

Daring Bakers - Stollen


Don't you love making foods that smell like the season? They fill the house with an amazing aroma, and set the scene for the festivities to come.

This month's Daring Bakers Challenge, Stollen, did just that - the smell wafting from the proving dough and the baked product is pure Christmas - rich, fruity, and fragrant. It also looks so Christmas-y, especially with some jolly Santa red strawberries in the centre (it is summer in Australia).

The 2010 December Daring Bakers’ challenge was hosted by Penny of Sweet Sadie’s Baking. She chose to challenge Daring Bakers’ to make Stollen. She adapted a friend’s family recipe and combined it with information from friends, techniques from Peter Reinhart’s book.........and Martha Stewart’s demonstration.

I was rather excited about this challenge, as I have always wanted to make stollen, and had never gotten around to it. Unfortunately, the taste of the stollen did not match my expectations or the delightful smell emitted from the stollen. I found it to be be rather dry and not at all to my liking. Now, this may be just me, because I gave a slab of it to Tim, who shared it with two of his family members, and he said they all liked it. Unless he is telling me very large porky pies, it is clear that it is just me who doesn't like stollen, and there is absolutely nothing wrong with it. However, I can say emphatically that the rest of the stollen will be recycled into bread pudding in the New Year. Currently, it is living in my freezer.

Here are some step by step photos of the stollen making process:

This is the risen dough turned out onto the counter before rolling. Doesn't it look just like a plump plum pudding?


This is the dough rolled out flat. At this stage, you could add marzipan to the centre before rolling it up into a big sausage - I wish that I had to give it more flavour:


After the dough has been rolled into a sausage, you join up the ends to form a ring around a bowl for a nice shape, then you cut slashes intermittently in the ring to make a wreath-like structure:


Unfortunately, I didn't have an oven tray large enough for the stollen to hold its lovely round shape, hence you see that my completed stollen is a little off centre.

Once the stollen has baked, you baste it with melted butter and sprinkle it liberally with icing sugar while it is still hot to preserve it. Here is a peek inside:


I really, really wanted to love this stollen, but I didn't.

Thanks to Penny for choosing a challenge I have wanted to make for a long, long time. You can check out some other versions of stollen by visiting the Daring Bakers blogroll.

Merry Christmas to all!! Hope you have a wonderful holiday spent doing what is important to you.

Friday, December 24, 2010

FFwD - Leek and Potato Soup


My French Fridays with Dorie selection this week was another one that I thought, "meh", initially, but which I did not mind once I made it.

I chose the leek and potato soup. I cannot honestly say that the thought of leek and potato soup sets my heart on fire, but it was either this or the carrots (which I won't get a chance to make). I figured I could eat the soup for lunch at work this week.

Here are all the ingredients, assembled and ready to go:


And here is the end result of those ingredients undergoing some Dorie magic:


I used some baby corn in the soup that I had just to use it up, as Dorie says that sweet corn could be added to the soup. I don't think it added that much, but was worth a try. I processed the soup after cooking to break down some of the bits, but I didn't strain it so that I could retain the texture.

The end result was a pleasant soup with a mild oniony flavour. It was perfectly nice and was just what it said on the tin.

To see what everyone else made this week, visit the FFwD LYL section for 24 December 2010.

Thursday, December 23, 2010

Gluten free Cranberry and Apricot Cake


Good morning everyone. Nearly made it to Christmas - yay! Life has been hellish, so I can't wait 'til I get some down time.

I am determined to keep giving you my pre-Christmas posts, so I am taking some time out to post about a lovely gluten-free, dairy-free cake that I gave my friend Craig for Christmas. It is a Cranberry and Apricot Cake from the December 2010 edition of Australian Good Food. The photo in the magazine was so pretty that I had to make it.

I am not sure what this cake tasted like, but it looked adorable - see the photo at the top of this post. In the magazine, they dusted it with icing sugar with a star shape left uncovered, but I think it is handsome as is.

If you would like to make this gluten-free treat, you will need:

1 cup dried cranberries
1 cup dried apricots
1/4 cup brandy
grated rind and juice of an orange
100g butter (or dairy-free spread like Nuttelex, in my case)
1/2 cup firmly packed brown sugar
2 beaten eggs
1/2 cup gluten free self raising flour
1/4 cup gluten free cornflour
1/3 cup white rice flour
1 teaspoon baking powder
1 teaspoon ground ginger
1/4 cup chopped pecans


Put the cranberries, apricots, brandy, orange rind and orange juice into a saucepan over low heat. Simmer the mixture for 10 minutes until most of the liquid is absorbed. Remove the fruit from the heat and set aside to cool.


Preheat your oven to 180 degrees Celsius. Grease and line a 20cm round cake tin.

With a stand mixer, beat the butter (or dairy free spread) and brown sugar together until fluffy. Add the eggs, one at a time, and beat well.

In a separate bowl, sift the flours, baking powder and spices together. Add the butter mixture to the dry ingredients, together with the cooled fruit and the pecans, and fold with a spatula until just combined. Spoon the batter into the prepared cake tin and smooth the top:


Place the cake into the preheated oven and bake for 50 minutes or until cooked through. Allow the cake to cool in the tin for 5 minutes, then turn it out onto a wire rack to cool completely.

Before serving, dust with icing sugar if desired.

Wednesday, December 22, 2010

Oriental Tea House - Little Collins St, Melbourne


Tim and I recently visited The Oriental Tea House in Little Collins St, Melbourne. As the name suggests, The Oriental Tea House sells a large range of teas and tea accessories (cups, pots etc). However, it also has a yum cha restaurant attached at all locations (and there are several throughout Melbourne).

The Little Collins Street branch has a funky, bar-like atmosphere, with 70s style colourful plastic tables and chairs, a mezzanine level, and lots of bright lights.

The yum cha menu is quite extensive, and there are currently some seasonal special dishes for Christmas. We chose to order two of the seasonal specials, along with some old favourites. Most of the dumplings come in a serve of 3, with the buns coming as a serve of two. The dishes are mainly less than $10 each, which is good value in my books.

First up, we ordered Santas Goody Bag Dumplings:

Aren't they cute? These were pork and apple in a buckwheat dumpling, tied off with chives, and accompanied by apple sauce. These were the pick of the night for me - it's a shame they are only seasonal.

Next are the BBQ Pork Buns:

These are pretty much standard issue that you will get anywhere - a steamed, sweet dough bun filled with minced tangy BBQ pork.

These were followed by the ginger prawn dumplings:


These gorgeous little dumplings are a favourite of mine, and comprise deep fried pork and prawn dumplings which are then steamed with a ginger suace - mmmmmm, mmmmmm.

Next up, we had the pork shu mai - again, these are prawn and pork dumplings, but are steamed, not deep fried:


Finally, we had another of the seasonal offerings - the turkey dumplings:

These were minced, spiced turkey encased in wonton wrappers, and served with "a dash of chilli". And oh boy, did they come with chilli! There was a little too much chilli for my liking, which diminished my appreciation of these considerably.

There is a limited range of desserts available at The Oriental Tea House, and my favourite is the egg custard tarts:


There are two tarts to a serve - just right for sharing. They flaky outer pastry shell encases a dollop of sweet egg custard.

Full details of the menu are available on the Teahouse website under the "Teahouse" sidebar.

A full range of drinks, both alcoholic and non-alcoholic, is available for purchase.

The Oriental Tea House is a relatively inexpensive place to enjoy a range of Asian-style dumplings in a relaxed, casual atmosphere. The staff are efficient and attentive, but can be stretched when the restaurant is very busy. Certain dumplings are available in pre-packed takeaway boxes if you are on the go. This chain of restaurants is a favourite of mine, and I will be going back.

Oriental Tea House
378 Little Collins St
Melbourne VIC 3000
Ph: (03) 9600 4230

Tuesday, December 21, 2010

TWD - Cardamom Crumb Cake


This week, my blogging pal Jill of Jill's Blog finally gets her turn to pick a recipe for us to make for Tuesdays with Dorie. She chose Dorie's Cardamom Crumb Cake.

This cake is not just flavoured with cardamom - it is also flavoured with coffee. The interior of the cake is moist and soft, while the top of the cake is coated with a crunchy streusel topping. It is a very forgiving recipe, as in a fit of Christmas season guilt, I used Nuttelex instead of butter - and it still tasted good. As an added bonus, this cake is also a cinch to make, and you mix it by hand - no stand mixer required. (Which means less washing up!)


I think this cake tasted best after a couple of days, as it became moister and the flavours developed. It is not particularly sweet, so it is a very adult treat for having with a nice cup of afternoon coffee.

Thanks to Jill for hosting us this week - she will have the recipe. And you can see other interpretations of this recipe by visiting the TWD blogroll.

Saturday, December 18, 2010

Italian fig cookies (Cucidati)


Do you like Spicy Fruit Rolls? They were one of my favourite biscuits as a child, so when I saw a recipe for Italian fig cookies that looked just like Spicy Fruit Rolls on p76 of the Christmas 2008 edition of Family Circle, I knew they'd be perfect for my Christmas boxes.

For me, these cookies were best after a couple of days when the fruit had softened the cookie and the flavours had matured. If I make them again, I would roll the dough thinner, as the cookies were a little on the chunky side for me. However, they are very tasty in a rich, fruity way.

To make them, you will need:

2 cups plain flour
2 teaspoons baking powder
1/3 cup sugar
250g butter, chopped
1 egg
2-3 tablespoons milk
extra flour for dusting and kneading

Filling

185g dried figs
60g pitted dates
150g raisins
1/4 cup sugar
1/2 cup undrained crushed pineapple
1/4 cup pecans, finely chopped
3 teaspoons plain flour
1 teaspoon grated orange rind
1/2 teaspoon cinnamon
1/2 teaspoon nutmeg

For the filling, put the dates and figs in a bowl, pour boiling water over them to cover, and stand for 5 minutes. Drain off the water and transfer the fruit to a food processor. Add the raisin, and process the fruit until smooth. Put the pureed fruit into a bowl and add the pineapple, sugar, pecans, flour, orange rind, cinnamon and nutmeg. Cover the bowl with cling film, and refrigerate overnight.

Next day, put the flour, baking powder and sugar in a food processor and pulse to combine. Add the butter and process until the mixture is crumbly. Add the egg and 2 tablespoons of milk, and process until the dough comes together. Add the extra tablespoon of milk if necessary for the right consistency.

Turn the dough out onto a bench and knead until smooth. Cut the dough in half.

Roll half of the dough into a 32cm x10cm rectangle. Spoon half of the filling lengthways into the centre of the rolled out dough. Fold the sides of the dough over the filling and roll it t become a log-shape. Repeat with the other half of the dough, then wrap both roll in cling film and freeze for 20 minutes.

Preheat your oven to 200 degrees Celsius. Line 2 baking sheets with baking paper. Remove the rolls of dough from the freezer and cut them into 1cm thick slices. Place the slices of dough onto the baking trays, and bake one tray at a time for 12-14 minutes or until the edges are lightly browned. Remove the biscuits from the oven and allow to cool on the tray for 5 minutes before transferring to a wire rack to cool.

Friday, December 17, 2010

FFwD - Sweet and Spicy Cocktail Nuts


It's funny, isn't it, how the simple things are often the best. This week's French Fridays with Dorie selection, the sweet and spicy cocktail nuts, couldn't be simpler. You coat two cups of nuts with egg white, sugar and spices, set the coating in the oven, wait for the nuts to cool, and there you have it - one of the best snacks ever.

I made these for my Christmas boxes, but I am keeping the leftovers for me - these nuts are moorish and intoxicating. I would make these again in a heartbeat.

To check out what the other FFwD dare-devils made, go to the LYL link for 17 December at the FFwD website.

Thursday, December 16, 2010

Fruit mince pies for Jane Austen's 235th birthday


Jane Bennet: "My dearest sister, now be serious. I want to talk very seriously. Let me know every thing that I am to know, without delay. Will you tell me how long you have loved [Mr Darcy]?"

Elizabeth Bennet: "It has been coming on so gradually, that I hardly know when it began. But I believe I must date it from my first seeing his beautiful grounds at Pemberley."

Jane Austen, Ch 59, Pride and Prejudice

Jane Austen, the English author who gave us so many wonderful novels (and in turn, plots for many great movies and mini series), would have been 235 years old today. Fancy that! My favourite Jane Austen novel will forever be Pride and Prejudice, immortalised in the 1995 television miniseries by "the Beeb" starring Colin Firth and Jennifer Ehle.

During the Regency period, Jane Austen and her family may well have enjoyed fruit mince pies, just as we do today. My research reveals that the original recipe for lemon mincemeat was first put down on paper by a close friend of Jane's, one Martha Lloyd.

Accordingly, in celebration of both the anniversary of Jane Austen's birth and Christmas, I present you with a recipe for fruit mince pies from pp238-9 of the Bourke Street Bakery Cookbook. There are plenty of different recipes for fruit mince pies; however, I chose this one because of the fantastic reputation the recipes from this book have on the Web, and because the quantity of mincemeat is perfectly scaled down to just make 20 pies - usually, mincemeat recipes make several jars of it.

To make these little pies, you will need:

Mincemeat

75g currants (I used sultanas)
75g raisins
30g mixed peel (I left this out)
2 tablespoons brandy
80ml apple cider
50g butter
75g brown sugar
1/4 teaspoon mixed spice
1/4 teaspoon cinnamon
300g apples
25g almonds, roughly chopped
zest of 1/2 lemon, finely grated
juice of 1/2 lemon
caster sugar for sprinkling on top of the pies

Pastry

500g butter, chilled and chopped into 1.5cm cubes
pinch of salt
260g icing sugar
80g egg yolks (~5)
665g plain flour

To make the mincemeat:

Put the currants, raisins and mixed peel into a medium bowl, pour over the brandy and cider, and combine well. Cover the bowl with cling film and allow the fruit to soak for around a week.

When you are ready to bake, peel, core and chop the apples into 5mm cubes. Set aside.

Melt the butter in a frying pan over medium heat, then add the brown sugar, mixed spice and cinnamon, stirring to combine. Add the cubed apple and cook it until just soft, but so that it retains its shape:


Remove the frypan from the heat, and stir in the alcohol-soaked fruits, the almonds, lemon zest and juice:


To make the pastry:

As there are a number of resting periods, I recommend that you start making the pastry a day before you want to bake the pies.

Leave the butter out of the fridge for around 20 minutes before starting to make the pastry so that it softens but remains cold.


Put the butter, icing sugar and salt into a food processor and pulse until pale and creamy. Add the yolks in 2 batches, pulsing after each addition to combine. Add the flour in 3 batches, pulsing after each addition until just combined.

Place the dough onto a floured work bench, and divide it into 3 equal portions. Flatten each portion into a disc, wrap it in cling film and refrigerate it for at least 2 hours or overnight. (This is vital, as this pastry is very buttery and delicate.)

Remove the chilled pastry from the fridge around 20 minutes before you want to roll it out. Roll the pastry discs individually between pieces of baking paper until they are 2-3mm thick. Place the rolled out pastry back into the fridge for 2 hours before using.

To assemble the pies:

When you are ready to bake, preheat your oven to 170 degrees Celsius. Spray 20 patty tin holes or mini tart tins (~6.5cm in diameter) with spray cooking oil or brush with butter. Use a round biscuit cutter of an appropriate size to cut out 20 bases for the tarts from the refrigerated, rolled out pastry, and a corresponding number of pastry lids. (I used the same size cutter for both - this worked better for me than using a larger cutter for the lid, as suggested by the cookbook.)

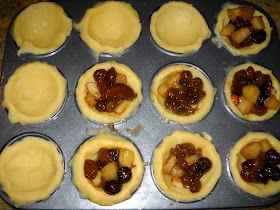
Line each of the tart tins with a round of pastry. (The Cake Mistress has the great suggestion of lining each tin with a thin strip of baking paper first so that is is easy to lift out the baked pies.) Spoon 2 1/2 teaspoons of fruit mincemeat into each tart shell:


Attach a lid of pastry to each tart using a little egg wash (lightly beaten whole egg) brushed around the edges of the base and the lids using a pastry brush. Press down gently on the edges of each lid to seal the pies. Cut a small cross in the centre of each pie to allow steam to escape, then brush the top of each pie with a little cold water, and sprinkle with caster sugar. (This makes the top of the pie crispy.)

Bake the pies in the preheated oven for 20 minutes or until golden. Allow the pies to cool in their tins for 10 minutes, then turn them out of the tins and leave them to cool on a wire rack.

Enjoy!

Wednesday, December 15, 2010

Salted caramel toffees


Time for another Christmas box post!

At the suggestion of my Pilates instructor, Emilia, I made salted caramel toffees, using
this recipe from Not So Humble Pie.

Mrs Humble's recipe was to make soft caramels; unfortunately, I knew early on that I was going to get hard caramels, so I made sure that I scored the mixture a number of times while it was setting so that I could cut it into squares later.

I had actually wanted soft caramels, so in a fit of pique, I refused to waste my fleur de sel on top of the toffees, and just used ordinary sea salt flakes.

Hard or soft, these are delicious - the sweet and the salt go well together - make them!

Tuesday, December 14, 2010

TWD - Apple Coconut Family Cake


This week's Tuesday with Dorie challenge, chosen by Amber of Cobbler Du Monde, was Dorie's Apple Coconut Family Cake. This cake and I were obviously meant for each other, because it gave me no problems whatsoever - which is the confidence boost I need after some of the kitchen tragedies I have had lately.

This cake is not dissimilar to Marie-Helene's Apple Cake that we made recently for French Fridays with Dorie, in that it is a sponge-like cake containing diced apples. However, it is a little fancier in that it contains coconut, and has a very pretty apple pattern on top glazed with apple jelly.

The cake itself is light and moist from the fruit, and would be perfect served warm with a little icecream on the side. Me, I just ate it plain:


Amber will have the recipe, and you can check out everyone else's take on this cake by visiting the TWD blogroll.

Sunday, December 12, 2010

Nigel Slater's Christmas Cake


It's beginning to feel a lot like Christmas ... Can't wait!

A few days ago, I posted about Nigel Slater's Christmas pudding. Now, being a huge fan of Nigel, I also decided to go with his Christmas cake recipe out of The Kitchen Diaries (which you can also find online here).

I was a little dubious about this recipe, because instead of soaking the fruit before baking, you just "feed" the cake with brandy once a week or so after it has been made. However, I needn't have worried - 6 weeks on from baking, and this cake tastes glorious - rich, moist and fruity, and just enough booze to give it a kick, but not as much as some. I have to say that I probably prefer a boozier cake, but you could always soak the fruit for this recipe first as well as feeding the cake.

Just like Nigel's Christmas pudding, this cake is a light fruit cake, but I kind of liked this aspect, because it was not as dense and heavy as some others - or not what my mother would refer to as "scenty".

For a peek inside the pudding and the cake, here you go:


Pudding is on the left, cake is on the right. I can confirm that the pudding was also moist and fruity - again, I probably like mine a little boozier, but this is very good as is, and would be perfect heated with custard or icecream.

Hope your holiday preparations are coming along well.

Friday, December 10, 2010

FFwD - My Go To Beef Daube


I do love comfort foods. There is nothing like a hearty stew on a cold night to make the world seem a brighter place, as it warms you from the inside out. My Mum used to make a beef stew she called Hotch Potch. I have tried many times to make hotch potch just like Mum's, but it is never the same. Mine tends to be a watery, less flavoursome imitation of the real thing.

Although it is summer here, my pick for this week's French Fridays With Dorie was My Go to Beef Daube - a type of rich beef stew with root vegetables, bacon and red wine. Although it was not perhaps what I'd normally make in summer, it was a delicious, rich dish which I nonetheless enjoyed.


The lighting gods were not smiling on me when I finally completed My Go To Beef Daube for this week's French Fridays With Dorie - so unfortunately, the best photo that I have of he finished product is the one that you see at the top of this post.

However, so that you get a feel for what this stew is like, I took some step by step shots when the lighting was much better.

First you dice the beef - Dorie used chuck, I used blade:


You also dice up a few slices of bacon:


and some carrots, parsnips and onion (I just threw in some garlic cloves as I didn't have a full bulb of garlic):


You then brown the bacon in the pan:


then the beef:


After setting aside the meat, you fry up the finely sliced onion:


followed by the rest of the veges, then the whole lot goes back into the pot with the red wine (or in my case, a mixture of red wine and water because I didn't have enough wine):


The daube then cooks for 2 1/2 hours all up in the oven. Voila! You have beef daube (and a kitchen that smells like cooking meat).

The long cooking time for this stew leaves the meat soft and tender, while the red wine adds a richness of flavour and smell.

This is a beautiful stew, which I will certainly make again - in the winter.

To see what the other FFwD members made this week, visit the LYL section for this week at the FFwD website.

Wednesday, December 8, 2010

Nigel Slater's Christmas Pudding; Cheese Update


How are your Christmas preparations coming along? Do you like to make food for gifts? Do you have traditional plum pudding, and if so, do you make it yourself?

I like to make food for gifts each year, as I have done for the past 4 years. I haven't made a pudding every year, but on a personal level, it wouldn't feel like Christmas if we didn't have plum pudding and custard for Christmas dinner. Sure, it might be 30 degrees Celsius with blazing sunshine outside, but to me, there is nothing like the smell and taste of plum pudding. Because it is only a once a year treat, it is extra special.

I made my plum pudding back in October so that it could mature and smell all spicy and boozy by Christmas, but you don't have to make it that early. My pudding will mostly be divided up and given to friends in Christmas gift boxes, but oddly, my Mum has asked if I could save a piece for her this year. I am happy to do so, but am curious because she has never asked for some before.

This year, I chose to make Nigel Slater's Christmas pudding from The Kitchen Diaries. You can also find the recipe online here. I only made a half recipe, as I didn't want two puddings. Nigel's pudding uses suet, which I have not used in plum pudding before. I just used boxed dried suet, as getting fresh suet is almost impossible in Australia.

Nigel's pudding is unusual in that it is quite light in colour - I am used to dark plum puddings. As to taste - I can't tell you about that just yet, but if you are interested, let me know and I will give an update in due course.

This pudding requires three and a half hours to steam, so you need to make it on a day when you can be at home the whole time to make sure that the pudding doesn't boil dry. Although Nigel says that you can reheat it for eating the same way, I recommend just cutting it into slices and microwaving it for 30 seconds or until heated through - especially if you are in the Southern Hemisphere for Christmas and the thought of steaming up your house is not appealing.

Nigel says he steamed the pudding using china bowls with paper and string tops, but I used a much more modern metal steamer with a clip-on lid.

The pudding looks like a beauty, so I can't wait to try it.

On a different topic, you may remember that I made camembert in a cheesemaking class recently. Finally, after 15 days of changing the ice almost daily in an esky "ice cave", here is my camembert, covered with downy white mould:


I worried about the wrinkly top, but my research shows that this is OK. As an educated guess, I understand that it is to do with the geotrychum used to encourage the growth of the penicillium, and the fact that the temperature in the esky may have been a little warmer from time to time than was ideal, encouraging the geotrychum to grow more quickly than the penicillium. Certain cheeses are actually supposed to have this wrinkly "geotrychum" rind, so as far as I am concerned, all is well.

I have transferred the camembert to the fridge, wrapped in baking paper and alfoil, to ripen for at least 5 weeks. That means no camembert for Christmas!


I also used the mozarella to make another pizza - this time, I brushed the pizza base with olive oil, sprinkled it with salt and pepper, and topped it with chunks of mozarella and gorgonzola and thin slices of ripe pear, followed by more seasoning:


This pizza was fabulous! I can't choose between this one and the Hawaiian version.

Stay tuned - more Christmas baking ideas will follow over the next couple of weeks.

Finally, I wanted to add a quick note to remember the 30th anniversary of John Lennon's passing. I am a huge Beatles fan, although the Beatles split up before I was born. I would love to know what John might have been doing musically if he was still with us. RIP John.