Thursday, May 30, 2019

Creamy Coconut Beef and Vegetable Curry with Rice


Winter has come to Melbourne almost overnight.  After enjoying beautiful balmy, sunny days, a couple of days ago, the cold and rain hit.  People have become walking bundles of clothes (mostly black - it is Melbourne!), and I have dug out the scarf, wool coat, hat and flannelette PJs.  Some people enjoy the cooler weather, but I am not one of them.  Unfortunately for me, it is likely to stay cool now until January next year, but the really cold months are now through to September/October.

One of the only good things about winter for me is the food.  Soups, stews, curries and hot puddings with warm custard go down a treat in winter.  It is also a good excuse to find a pub with a warm fire and snuggle in with your favourite drop. 

I recently made this Creamy Coconut Beef and Vegetable Curry, based on this recipe from Taste, which is perfect for the cold weather.  It's made in the slow cooker, so is easy on the labour.  Next time, I'd thicken up the sauce (mine may have been thin as I used frozen vegetables, adding extra moisture), but flavour wise, it fit the bill.  Ginger, coconut and tomato flavours combined with the curry paste made this a wonderful dish.

To make it, you will need:

1 tablespoon oil
1 tablespoon chopped fresh ginger
1/3 cup rogan josh curry paste
1.5kg chuck beef, cut into 4cm cubes
400g can chopped tomatoes
250ml chicken stock
500g packet frozen vegetables
1 tablespoon cornflour
270ml coconut cream
boiled or steamed rice 

Heat the oil in a large frypan, then add the ginger and cook until softened.  Add the curry paste and cook until aromatic.  Add the beef and cook until it is just browned.

Put the beef mixture into a slow cooker.  Add the tomato and stock, and stir to combine.  Cook on high for 5 hours.  Add the vegetables and cook for another hour.

Combine the cornflour with a third of a cup of coconut cream, and add to the slow cooker.  Cook with the lid off the cooker for 10 minutes or until thickened (which did not happen for me!).

Serve the curry with the rice.

Tuesday, May 28, 2019

TWD - Crackle Top Cream Puffs

 
This week's Tuesday with Dorie recipe is Crackle Top Cream Puffs.  These are little balls of choux pastry with a crackly pastry top, and filled with whatever you desire.

I made Dorie's chocolate pastry cream, but did not have quite enough to fill my 12 large cream puffs, so I filled two of them with Chantilly cream.  Here you can see all the permutations of my cream puffs:


Of course, these were delicious.  I have never made cream puffs with a crackle top before, and it was a revelation - so delicious.  It adds a sweet, crunchy layer to the top of the cream puff.  I have also never made chocolate pastry cream before.  Though tasty, it is very rich, so I prefer the vanilla version.

To see what everyone else made this week and what they thought  of it, visit the LYL section of the TWD website.

Sunday, May 26, 2019

Jordan Rondel's Lemon and Pear Cake with Rosewater Drizzle


Another fabulous Jordan Rondel cake that I made recently was her Lemon and Pear Cake with Rosewater Drizzle.  Luscious slices of pear adorn the top of a lemon cake, and a rosewater flavoured icing is drizzled over the top of the cake.
  

This cake is as light and flavoursome as it looks.  If you would like to make it, you will need:

2 ripe pears, cut into 8 wedges
200g butter
200g sugar
4 eggs
1 teaspoon vanilla
200g almond meal
50g flour
pinch of salt juice and zest of 2 lemons

Preheat your oven to 180 degrees Celsius.  Bake the pear segments in the oven until soft and caramelised for 20 minutes.  Remove from the oven and allow to cool, but leave the oven on.

Line a 22cm round cake tin with baking paper.  

In the bowl of a stand mixer, beat the sugar and butter until light and fluffy.  Add the vanilla and beat in the eggs, one at a time.

Fold in the almond meal, flour and salt until just combined.  Fold in the lemon juice and lemon zest.  

Scrape the batter into the prepared cake tin and smooth the top.  Arrange the pear slices on top of the batter, pressing in lightly.

Bake the cake in the oven for 45 minutes or until cooked through when tested.  Remove the cake from the oven and allow to cool in the tin for 10 minutes before turning onto a wire rack to cool completely.

When the cake is cool, make the icing by mixing 110g of icing sugar with 2 tablespoons of rose water and the zest of one lemon.  Drizzle over the top of the cake.

Slice and enjoy!


Tuesday, May 21, 2019

TWD - Chocolate Oatmeal Biscoff Cookies


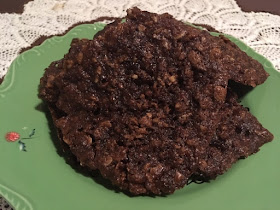
This week's Tuesdays with Dorie recipe is Chocolate Oatmeal Biscoff Cookies.  These are oatmeal cookies flavoured with chocolate and Biscoff spread (or in my case, Twix spread). 

My cookies spread like wildfire in the oven, so I ended up with two trays of connected cookies.  They spread so much that they were kind of like lace cookies.  OK, so my cookies are not the prettiest, but they tasted really good. 

I took them into work and they all got eaten - testament enough to their flavour, I'd say.  I only made half a batch as I was daunted by the thought of having a batch of 50 cookies (being a full recipe).

To see what everyone else made this week and what they thought of it, visit the LYL section of the TWD website.

Sunday, May 19, 2019

Jordan Rondel's Miso and Caramelised White Chocolate Cake


Miso is an unusual ingredient that is more and more finding its way into sweet desserts for its slightly salty flavour.  I have miso in my fridge, so I am always eager to find recipes to use it up.  Accordingly, I jumped at the chance to make Jordan Rondel's miso and caramelised white chocolate cake

Jordan had sesame seeds in her cake as well, but contrary to what I thought, I did not have any in the house at the time, and as I had started making the cake, it was too late to procure them.  I don't think the cake suffered as a result.  The caramelised white chocolate is devine, and is offset nicely by the umami flavour of the miso.  The cake is topped with a tangy cream cheese icing.


If I have piqued your interest and you want to make this cake, you will need:

120g white chocolate chips
130g butter
150g brown sugar
4 tablespoons white miso paste
1 teaspoon vanilla extract
3 eggs
150g plain flour
50g ground almonds
2 teaspoons baking powder
1/2 cup Greek yoghurt

Icing 

150g butter
2 cups icing sugar
100g cream cheese
1 teaspoon vanilla extract

Preheat your oven to 180 degrees Celsius and grease and line a 22cm cake tin.

Place the white chocolate chips on a baking tray and bake for 8 minutes or until golden brown.  Cool in the fridge.

In the bowl of a stand mixer, cream the butter, sugar and miso paste.  Add the vanilla and then beat in the eggs, one at a time.  Gradually mix in the flour, almonds and baking powder.  Add the yoghurt and mix until just combined.  Fold in 100g of the caramelised white chocolate chips.

Scrape the batter into the prepared cake tin and bake for 45 minutes or until cooked through.  Allow the cake to cool in the tin for 10 minutes before unmoulding onto a wire rack to cool completely.

To make the icing, beat the butter and cream cheese together until smooth.  Add the icing sugar and the vanilla and beat until smooth.  Ice the top of the cake with the icing and decorate with the reserved 20g of caramelised white chocolate chips.


Tuesday, May 14, 2019

TWD - Cookies-and-Cream Tartlets


This week's Tuesdays with Dorie recipe is Cookies-and-Cream Tartlets.  In my case, I decided to go big or go home and made a single large Cookies-and-Cream Tart, using the same quantity of ingredients as the four mini tarts suggested by Dorie.

The cream in the tart is in the ganache, although you can also decorate the tart with cream.  A shortcrust pastry case is coated with a layer of cookie butter (in my case, Twix spread mixed with a little cinnamon to imitate the Biscoff spread that you were meant to use but is hard to get here), then filled with a ganache mixed with Speculoos.

I made my own Speculoos using Dorie's recipe as I could not buy them readily here:

   
As an optional extra, I decorated the top of my tart with more speculoos crumbs.  The tart is then refrigerated until set, before slicing and serving:


What I can I say - this was devine!  Silky ganache studded with biscuit pieces in a buttery pastry shell - what more could you want. 

To see what everyone else made this week, visit the LYL section of the TWD website.

Sunday, May 12, 2019

Peony Cake at Miss Biscuit Beginner's Cake Decorating Class


Happy Mother's Day to all the lovely mums out there!! 

I thought it would be appropriate for today to show off a cake that I decorated at a Miss Biscuit Beginner's Cake Decorating Class last weekend, which could have been given to mums today to celebrate.  (My mum is too far away and doesn't like cake that much, so my cake went to work.) 

This beginner's cake decorating course involved learning how to level and tort a three layer cake, stack and assemble the layers and fill and cover with buttercream, work with gold leaf and gold paint, and how to create a beautiful gum paste peony to crown the top of the decorated cake.

We were taught by the lovely Miss Lisa, who runs a wedding cake decorating business but who has chosen to also pass on some of her skills to us:

 
Lisa was very patient, helpful and kind throughout the class, happy to answer countless questions, and to assist the "all thumbs" people like me without judging.  (For the record, the balling tool and I were not friends, nor were I and the cake scraper used to level out the buttercream.)

Here is Lisa demonstrating how to roll out the gum paste and cut it into petal shapes:

 
We made three stamens, 4 x small petals, 5 x medium petals and 7 x large petals.

After veining and wiring the petals (wiring is not for the faint hearted!), you curl the edges using a balling tool - not my friend:

 
After the petals have been dried (we cheated and used a dehydrator for time reasons), you dust the petals and stamens with petal dust for colour and movement:


Then you bind the stamens and petals together using florists' tape: 

 
Et voila - your very own gorgeous peony:

 
While the petals were doing their drying thing in the dehydrator, we cut our commercially made mud cakes into three layers using both a knife and a wire cutter (to see which one suited us best), filled the layers with Over the Top brand buttercream, did a crumb coat, and finally covered the outside of the stacked cake with more buttercream and levelled it out with a scraper (yikes!).

Then we got to be arty again, and painted the deliberate rough rim on our cakes with gold paint (made from gold lustre dust + rose spirit), and carefully brushed some gold leaf onto the sides of our cakes (great for hiding the imperfections): 


Finally, we bent a hook at the end of the wire stem of our peonies and stabbed them into the top of our cakes, like a fairy queen atop a float: 


At the start of the class, I had a few moments where I wondered at the wisdom of putting myself through it all, but at the end, I was very proud of my cake.  It's far from perfect, but it looks very pretty, and I did it myself - under the patient guidance of Lisa.  My colleagues who knew the story behind the cake were very impressed with the end result - and so was I.

65a Charles Street
Seddon VIC
Ph: 9687 2916 
 
(Note that there is also a store in East Balmain in Sydney)

Thursday, May 9, 2019

Peanut Caramel Slice


The latest thing in the supermarkets is chocolate flavoured like Arnotts biscuits.  I am yet to try these, but I think the Iced VoVo version is a must, as well as the Jatz (salt + chocolate = yum, right?).

In the meantime, I have made a slice that reminds me of a Snickers chocolate bar.  The recipe is for Peanut Caramel Slice from the April 2019 edition of Woolworths Fresh magazine.  It looked delicious in the magazine, and it did not disappoint. A biscuit base is topped with a filling of peanut-butter flavoured Top'n'Fill caramel (or do what I did and make your own dulce de leche from condensed milk), then topped with chocolate studded with chopped peanuts.  It is not one for the school lunch box because of the peanuts, but it sure is scrumptious.


To make this smashing slice for yourself, you will need:

250g packet plain sweet biscuits (I used Marie)
125g melted butter
2 x 380g Top'n'Fill caramel (or an equivalent amount of dulce de leche, home made or otherwise)
1/2 cup smooth peanut butter
250g dark chocolate chips
1/4 cup finely chopped roasted peanuts 
olive oil spray

Preheat your oven to 180 degrees Celsius and line a 30cm x 20cm slice tin with baking paper.

In a food processor, blitz the biscuits into crumbs, then add the melted butter and blitz again.  Press the crumbs over the base of the prepared slice tin, and freeze for 10 minutes.

Put the Top'n'Fill or dulce de leche into a bowl.  Add the peanut butter and stir until well combined.  Scrape the mixture carefully over the top of the biscuit base and spread out evenly, being careful not to disturb the crumbs of the base.  Bake for 20 minutes.

Mix together the chocolate chips and chopped peanuts in a bowl.

Remove the slice from the oven and spray the top of the caramel with olive oil spray.  (I forgot to do this and it didn't seem to hurt the slice.)  While the caramel is still hot, scatter the peanut/chocolate chip mixture over the top of the caramel layer, and return the slice to the oven for another 5 minutes.  Remove the slice form the oven and spread out the chocolate evenly over the top of the slice.

Chill the slice in the fridge for 4 hours to set the chocolate, then cut into bars to serve. Enjoy!

To finish off this post, I am proud to show off a cross stitch table cloth featuring kittens playing with balls of wool that I finished stitching while I was on holidays over Easter.  Isn't it pretty! It will go perfectly on the occasional table in my living room.


Tuesday, May 7, 2019

TWD - Old Bay Pretzel-and-Cheese Cookies


This month's Tuesday with Dorie (Dorie's Cookies) recipes both present problems for me as an Australian.  One recipe calls for biscoff spread, which is not readily obtainable here; the other calls for Old Bay seasoning, which is non-existent here.

I went with the Old Bay Pretzel-and-Cheese Cookies.  Old Bay is a particular brand of seafood seasoning found in the States.  To make a substitute requires a list of ingredients as long as your arm.  The Old Bay substitute seems heavy on celery salt, which of itself is hard to get here.  I only needed a teaspoon of seasoning to make half the cookie recipe, so I ended up making the substitute seasoning sans anything that I did not already have (being celery salt, dry mustard, all spice, white pepper and crushed pepper flakes). 

These cheesy, savoury cookies, containing crushed pretzels and made by the roll and slice method, are quite tasty.  I agree with Dorie that they would be good to serve with a beer.  I'd definitely consider making these again as a savoury snack for guests.  In the meantime, I'll need to figure out an easier way to get the spices into the mix.

To see what the other Dorie bakers made this week, visit the LYL section of the TWD website.