Friday, January 30, 2009

Adios Abi - Torta mil hojas


Yesterday was my friend Abi's last day at our work before she heads off to Sydney to work as a church leader. I of course wanted to mark the occasion in the usual way by making her a cake.

Abi is of Chilean heritage, so I thought it would be the perfect opportunity to make a cake that I have become obsessed with - the torta mil hojas, or "cake of a thousand leaves". It is the name of the cake rather than its actual composition that fascinates me - it sounds so pretty. I understand from Abi that this cake is usually made with stacks of very thin cookie-like layers, and takes about 12 hours to make. However, Gloria of Canela's Kitchen made a torta mil hojas for Chilean Independence Day in September which is based on thin layers of cake. I decided to make Gloria's version of the torta mil hojas for Abi. Gloria's recipe for the torta mil hojas is here.

Basically, you make 9" discs of cake to serve as the layers - make as many discs as you have batter for. For simplicity, instead of discs spread on parchment paper, I baked 3 cake layers in 9" tins and divided each in half, giving me 6 layers:

You then make dulce de leche to sandwich the cake layers together. While you can boil up cans of condensed milk, I made mine from scratch using another recipe from Gloria's site, which you can find here.

It takes about an hour and a half to make dulce de leche from scratch using the method outlined by Gloria. You start with a mixture of milk and cream and sugar that looks like this:


and you boil it until it looks like this:


and finally, you get this:


As you can see, the liquid condenses down to a very thick caramel. However, the blessing is that you don't have to stir the mixture constantly during the less volatile stages of the process - I in fact watched an episode of Dr Who in another room while running back and forth to check on the progress of my dulce de leche. (For Dr Who fans, it was David Tennant's first episode after the "old" Doctor, Christopher Eccleston, regenerated - the Christmas Invasion episode.)

Once your dulce de leche has cooled, you halve each of your cake layers using a serrated knife, and glue them all together with dulce de leche:


The end result is something that resembles a stack of breakfast pancakes (even if, in my case, it also resembles the Leaning Tower of Pisa):


I believe that Gloria used a mould to avoid the lop-sided effect.

Finally, you make an almond paste with sugar syrup and almond meal and egg whites (be careful when making this - it spits!):


This paste is plastered all over the cake like frosting:


If you want to know what the cake looks like inside, refer to the picture of the slice on Gloria's post - it is an accurate representation of what you end up with (ie a stripey cake!).

This cake is very sweet and very filling. Someone at work described it as a Mars bar without the chocolate, to give you an idea of what it tastes like. However, it tasted good, especially if you like your sugar dial turned to "high".

Abi enjoyed this cake, although she said her nan's torta mil hojas is the cookie dough version which she coats in a meringue. While I could find plenty of recipes for the cookie dough version of torta mil hojas online, none of them were coated with meringue. Does anyone have a recipe for torta mil hojas matching this description?

This cake was fun to make, if somewhat involved. I've always wanted to make my own dulce de leche from scratch, and I now understand why they sell a tiny jar for $7 at Koko Black - it takes a lot of ingredients and a lot of work! However, it was worth it - and I got to lick the pot (after it had cooled, of course) ;).

Thursday, January 29, 2009

Daring Bakers - Tuiles


This month's challenge is brought to us by Karen of Baking Soda and Zorra of 1x umruehren bitte aka Kochtopf. They have chosen Tuiles from The Chocolate Book by Angélique Schmeink and Nougatine and Chocolate Tuiles from Michel Roux.

Karen and Zorra asked us to choose one of the batters given, shape it, and pair it with something light.


I made the plain tuile recipe, and used it to make flower shaped tuiles and fortune cookies.


I paired the flower shaped tuiles with a passionfruit and white chocolate mousse with raspberries from Nigella Lawson's Forever Summer:


To make this mousse, refer the recipe here. You end up with fluffy white chocolate mousse on the top, and raspberries in a kind of passionfruit syrup underneath.

When eating the mousse, I scooped it into the tuiles, like a little boat. It was a delicious combination.


I paired the fortune cookies with a beef and lemongrass stir fry from Janelle Bloom's Fast, Fresh and Fabulous:


To make this stir fry, you will need:


600g beef strips
2 teaspoons cooking oil
1 finely chopped stick lemongrass, white part only
2 crushed cloves of garlic
1/2 cup cashew nuts
1 1/2 tablespoons cooking oil
1 tablespoon fish sauce
1 tablespoon palm sugar (I used brown sugar)
juice of 1/2 a lime
150g snow peas (I left mine whole for texture, although Janelle recommends slicing them)
cooked jasmine rice to serve


I also added a chopped red capsicum for colour.

Place the beef strips in a bowl and toss with the first quantity of oil in the above list, lemongrass and garlic.

Put the cashews in a cold wok over high heat, and toast, then tip them onto a plate. Heat the wok over high heat, then once is is hot, add the second quantity of oil and use it to coat the wok. Cook the beef in the wok in 4 batches, then remove to a plate.

In a small bowl, stir together the fish sauce, sugar and 1 tablespoon of the lime juice. Place this mxture, the cooked beef, the snow peas (and capsicum, if using) and the toasted cashews in the hot wok, and stir fry for aorund a minute. Serve the meat over cooked rice.

Because the tuile recipe is for a sweet batter, the fortune cookies made out of it were rather odd with the stir fry, but no matter - they were fun to make.

Thanks to Karen and Zorra for hosting this month's Daring Bakers' challenge. To check out what creative ideas other Daring Bakers had for their tuiles, go to the Daring Bakers blogroll.

Tuesday, January 27, 2009

TWD - Fresh Ginger and Chocolate Gingerbread


This week's Tuesday with Dorie features a Fresh Ginger and Chocolate Gingerbread, chosen by Heather of Sherry Trifle. I have made gingerbread once before, but not a luxe chocolate version like this one.

This gingerbread contains ground ginger, fresh grated ginger and stem ginger (or in my case, glace ginger). It also contains chocolate on the outside and chocolate on the inside - what more could a girl want?

Here is my uniced gingerbread waiting patiently on the cooling rack:


And here it is again with its handsome shiny coat of real chocolate icing, with the added depth of coffee:


This was rich, adult-tasting and delicious. The tang of the ginger was a perfect foil for the rich depths of the dark chocolate - although you are talking to a girl who loves chocolate coated ginger, and receives it as a gift for every birthday and at Christmas.

You can check out the full recipe on Heather's blog, and gaze longingly at everyone else's gingerbread by checking out the TWD blogroll.

Monday, January 26, 2009

Australians all let us rejoice ... Vanilla slices and pavlova


Today is Australia Day here in Oz, and to celebrate, we are granted a long weekend to hold barbecues, meet with friends and to enjoy all that is good about Australia. Officially, it is the day on which the First Fleet, under the leadership of Governor Arthur Phillip, arrived at Sydney Cove in 1788.

I love to celebrate everything with food, so I made some traditional Aussie treats to share with my colleagues at work on Friday.

First up, I made vanilla slices (aka custard slices)


These consist of a firm custard sandwiched between two layers of puff pastry, with sweet icing on top.

I used a recipe from Kate McGhie's Cook, which uses a combination of cream and milk instead of pure cream for the filling, and features a passionfruit icing - my favourite!

If you would like to know what Aussies are raving about when they refer to the vanilla slice, you will need:

2 sheets puff pastry
3/4 cup sugar
1/2 cup cornflour (corn starch)
4 tablespoons custard powder
4 cups milk (I used reduced fat milk and it worked fine)
1 cup heavy cream
2 teaspoons vanilla extract
60g butter
1 egg yolk, lightly beaten

Icing

2 cups icing sugar
1 tablespoon butter
1 tablespoon hot water
pulp of 1 passionfruit

Preheat your oven to 200 degrees Celsius, and line 2 baking trays with baking paper or silicone mats. Grease and line a 23cm square pan with baking paper.

Put each puff pastry sheet on a lined baking tray, then cover each sheet with another baking tray to act as a weight. Bake the sheets in the oven for 15 minutes, then remove them from the oven, take off the weights, prick the pastry sheets all over with a fork, and return them to the oven to bake for a further 10 or so minutes until the pastry is golden brown. Remove the cooked pastry from the oven and allow to cool. Once cooled, cut one sheet of the pastry to fit firmly inside the base of the prepared pan.

Blend the sugar, cornflour and custard powder together in a saucepan, and using some of the milk, stir the mixture to form a smooth paste over medium heat. Gradually stir in the rest of the milk, the cream and the vailla, stirring all the while over the heat, until the custard is smooth. Add the butter and simmer the custard until it is thick and smooth, and it no longer tastes like cornflour. Once the custard has thickened sufficiently, remove it from the heat and stir in the egg yolk.

Pour the custard into the prepared pan over the top of the pastry base, smooth it over, then top with the remaining sheet of cooked puff pastry. Refrigerate the vanilla slices until set.

Once the vanilla slices are cool, ice them with an icing made, by combining all of the icing ingredients in a bowl and mixing to the desired consistency, using more water or icing sugar if necessary. Spread the icing over the top of the vanilla slices and allow to set. When the icing has set, cut the vanilla slices into squares with a hot knife. Enjoy!

With respect to pavlova, there is
an ongoing dispute between the Aussies and the Kiwis as to who created it. Regardless, pavlova is delicious, and that is what matters to me.

For anyone who has lived thus far without tasting pavlova, it is like a huge meringue with a marshmallowy centre, which is traditionally topped with lashings of whipped cream and fruit. In my case, I topped the pavlova with leftover filling from Dorie's berry surprise cake and blueberries:


My pav was made using a recipe from Baking by New Holland Publishers, as follows:

5 egg whites
1/4 teaspoon salt
1 cup sugar
2 teaspoons vinegar
2 teaspoons cornflour (I left this out, as I had run out, with no ill effects)

Preheat your oven to 150 degrees Celsius, and line a baking tray with baking paper and draw a 23cm circle on it. Grease the circle and dust with cornflour.

Beat the egg whites with an electric stand mixer until stiff, then gradually beat in the sugar. (If using the cornflour, blend it with half the sugar before beating into the egg whites.) Sprinkle the vinegar over the beaten egg whites, and fold in gently.

Pile the meringue into the circle on the baking paper on the baking tray, and bake in the oven for around 1 hour. Opent he oven door (but don't remove the pvalova), and allow the pavlova to cool in the oven for 20 minutes before removing it from the oven and allowing it to cool completely.

Once the pavlova has cooled completely, and just before serving, top it with whipped cream and fruit to taste.


Last but by no means least, the lovely Miranda, aka The Blonde Duck, from A Duck in Her Pond, gave me the Lemonade Award - when life gives you lemons, make lemonade. Thanks Duckie!


The rule of the award are:

1. Put the logo on your blog/post.

2. Nominate 10 blogs which show great gratitude and/or attitude.

3. Link to your nominees within your post.

4. Let your nominees know that they have received the award by commenting on their blog.

5. Share the love and link to this post from the person who gave you this award.

Without further ado, my nominees for this award (in no particular order) are:

Ivy of Kopiaste


Arfi of Homemades

Susan of Food.baby


Gretchen of Canela & Comino


Lorraine of Not Quite Nigella

Go check out these girls' blogs - they are terrific.

Happy Australia Day to y'all!

Tuesday, January 20, 2009

A journey back in time just for fun ...


Through my friend Ivy, who heard about it through Rosa, I learned of a fun invitation from Bloga2 for bloggers everywhere to take a journey back in time just for fun by perusing their photo albums, laughing at the fun memories and posting a photo of themselves as a child.

I have enjoyed looking at the photos of Ivy and Rosa, so I thought I'd join in - and here I am!

If you let Bloga2 know that you have participated, they will add a link to your post to the original invitation.

Have fun - I hope that at least some of you will join in!

Surprise!! TWD - Berry Surprise Cake


Everyone loves a surprise, and so it is in this week's Tuesday with Dorie, hosted by Mary Ann of Meet Me in the Kitchen - there's a surprise in the middle of the lovely cake featured in this post.

Now I am not a huge fan of creamy cakes, but I did enjoy this one - the tartness of the berry "surprise" balanced out the sweetness of the cream, making for a satisfying mix. The base genoise, although a "diva" of a cake (most people's sank to some degree, as did mine), was a light and fluffy vehicle for the filling and topping, so that you were not wallowing in a feeling of fullness by indulging in a slice.

Without ado, you start off with a genoise (this is a somewhat flattering photograph of it - in reality, I was sure that it was more sunken):

which you chop the top off of, and carve out a "nest" for the filling:


then brush some kirsch-flavoured syrup in the base and up the sides of the nest before lining with the cream cheese-whole cream filling:


then pop some berries on top and cover them with the remainder of the filling:


and finally pop the top of the cake back on and smother the lot in whipped cream. Decorate with berries before slicing:


and enjoy!!!

Thanks to
Mary Ann for hosting TWD this week - you can find the full recipe at her site. And if one surprise is not enough, feel free to indulge by checking out variations of this cake at the TWD blogroll.

Saturday, January 17, 2009

Banana and Blueberry Muffins


Whaddya do when you have a punnet of not so fresh blueberries and two frozen bananas from before Christmas? Why, you make banana and blueberry muffins of course!


Not really knowing what to do with these two odd bedfellows, I did a Google search and found a spot-on recipe for banana and blueberry muffins on Taste.com.au. You can find the recipe here. The bananas looked scary when I thawed them, because they went from stiff and yellowish to black and floppy, but the banana inside was perfectly preserved and in a suitably mushy state to mash for muffins.


These muffins are absolutely delish, especially when they are still warm. They are also packed full of goodness, as in addition to the banana and blueberry, they contain oats, honey, yoghurt and grated apple. This is quite a sneaky way to get your kids to eat something that is good for them without them even knowing! They also smell great while cooking, filling the kitchen with a sweet cooked banana aroma.


I have frozen half of these muffins, and I am looking forward to taking these for my morning tea at work over the next week or so. Yum!

Friday, January 16, 2009

Lemon Meringue Pie


From my last two posts, you'd swear it was a citrus kind of week, but actually, I made this lemon meringue pie during the September holidays at my Mum's place, and haven't had a chance to post about it yet (ummm, primarily because I didn't have the recipe).


Now, I know that recipes for lemon meringue pies are a dime a dozen, but I thought this one was worth posting because it so easy to make, doesn't use that many ingredients, and the filling doesn't weep (at least, mine didn't), and isn't rubbery. I love lemon meringue pie, but the commercial versions in coffee shops are often very tall, sweet and over-bearing. This home-made version cannot be accused of any of these things, with a nice balance between the meringue and the lemon filling. The pie crust is an easy biscuit dough.

The recipe comes from my old high school home economics cookbook called Day to Day Cookery by L M Downes, which is battered, yellowed and falling apart. While a version of this book is still available today, it is really nothing like the old version. The newer version is a full colour A4 sized job, with fewer recipes, while the old one is a tiny A5(?) size, packed with recipes and with no pictures, and resembles a paperback novel in appearance. It is also one of those old fashioned books that assumes you know something about cooking, so it doesn't hold your hand through every step in the instructions. This in some ways is part of its charms, and probably why my Mum adopted it - it lives at her house.

To make this pie, you will need:

Crust

60g butter
60g margarine (I just used 120g margarine as my Mum doesn't buy butter)
1/3 cup sugar
3 tablespoons milk
1 1/2 - 2 cups self raising flour (whatever it takes to get the right consistency)
pinch of salt


Filling

1 1/2 cups water
4-5 tablespoons cornflour
2 egg yolks
1/2 cup lemon juice
1/2 teaspoon lemon zest
3/4 cup sugar
1 tablespoon butter
2 egg whites
4 tablespoons sugar


Crust

Beat the butter and sugar to a cream. Sift the dry ingredients together, and add alternately to the mixture with the milk to make a stiff paste.

Knead the dough on a lightly floured surface, roll out to ~1/4 inch thickness, and use it to line a greased 23cm pie dish. Bake the crust in the oven at 180 degrees Celsius until it turns golden brown (see, no details like times here!), and remove from the oven to cool.

Filling

Blend the cornflour with the water, and add the egg yolks, lemon juice, zest, butter and sugar in a medium saucepan.

Stir the mixture over medium heat until it thickens, then continue to cook it, stirring all the while, for around 2 minutes.

Remove the mixture from the heat and allow it to cool a little before spooning it into the cooked pie crust.

Whisk the egg whites until stiff, then gradually beat in all of the sugar until it dissolves. Pile the meringue on top of the pie, then place it in a pre-heated slow (~150 degrees Celsius) oven until the meringue is browned (~10 minutes).

Remove the pie from the oven and allow to cool completely before slicing and serving.


Unfortunately, no-one at "home" appreciates home-made desserts, and I ended up eating about half of this myself, and most of the rest was thrown out. It tasted delicious - it is just a weird quirk of my family that, because we grew up with home-made baked goods and my Mum has been baking since she was a child, such things are not regarded as anything to get excited about.

If you try this out, I hope you like it!

Wednesday, January 14, 2009

Key Lime Tarts


Since I started blogging, I have often read about and longed to try key lime pie, but somehow, the right moment never came around. However, when I was going through my freezer this week, my piece of Loretta Sartori's "1,2,3" shortcrust dough jumped out at me, and I couldn't have imagined a better way to use it than to make key lime pie.

For convenience when sharing with the troops, I made little key lime tarts instead of one big pie (and made friends with my new pastry scraper).

Of course, I didn't have real key limes, just ordinary ones, but no matter - the filling in these tarts was amazing! I used this recipe from Nikki of Baking Bites for the filling, and just loved it. At first, I wondered how on earth the filling was going to set, but was surprised when it firmed up even before I refrigerated the tarts.


What else can I say - I adored these tangy yet creamy little tarts, which more than satisfied my citrus craving.

Tuesday, January 13, 2009

TWD - Savoury Corn and Pepper Muffins


This week's Tuesday with Dorie has a spicy zing - hosted by Rebecca of Ezra Pound Cake, she has chosen Dorie's Savoury Corn and Pepper Muffins. When I first read the title of this recipe, I thought "pepper" referred to the spice; in actual fact, it refers to jalapeno peppers and capsicum (called a pepper in the US).


I have joined baking groups to make me try things that I would never otherwise have tried, whether because of the perceived skill level required or my expectation that I would not like the taste. These muffins would have fallen into the latter category if I had not joined Tuesdays with Dorie, because my only prior experience with savoury muffins is of horrendous tasting store bought versions, which taste more like dust than a muffin. I also generally prefer sweet things.


However, these muffins surprised me - I really liked the flavour. Although they looked a little odd to me with their rough, bumpy tops, the flavour was a winner, starting off sweet with the corn, coriander and capsicum, and then developing a real zing as the chilli flavour hits you. They were really really tasty, and - shock horror - I'd make them again!


I followed the recipe for these muffins to the letter, except that I couldn't find jalapenos, so I left them out, and I made mini muffins instead of the full size versions. I also made microwave chilli jam, ostensibly to eat with the muffins, but it turned to rock toffee that hardened in the jar. Oh well, these muffins were so good on their own, so I didn't even miss the jam.


The troops liked these muffins too. I wasn't sure how they would be received, as they are very different to what I usually make, but I was pleasantly surprised at the response.


All round, these muffins were a pleasant surprise. Thanks to Rebecca for hosting TWD this week. To see all the other TWDers versions of these muffins, check out the TWD blogroll (and don't forget to check out a few of our new members' blogs).

Saturday, January 10, 2009

Happy birthday Matt & Julien - Carrot Cake


While we were away on Christmas vacation, our CE "twins", Matt and Julien, celebrated their respective birthdays on 29 December. So that they did not miss out on cake just because their birthdays fall during Christmas vacation, I made them a carrot cake on the same day as Susie and Racquel's pina colada cake and made a special trip to take it in (as I was on secondment all this week).


Matt's favourite cake is carrot cake, so I made carrot cake for both of them. As it was late at night and I didn't want to have to dig through recipe books, I pulled out my reliable The Cook's Companion by Stephanie Alexander, which contains recipes in in order of key ingredient, and lo, under "Carrots", she had a recipe for "simple carrot cake".


I substituted cashews for walnuts in the recipe, as that was what I had on hand. Unfortunately, the cake turned out a little flat because I used a larger tin than recommended, so I sliced it in half and filled it with cream cheese frosting to plump it up a bit. While I didn't get to taste the cake, the frosting was to die for (yep - I licked the bowl :)). The cake is dead easy to make, so if you are feeling a little world weary but need to whip up a cake, this recipe is a winner.


To make this cake, you will need:


125g self-raising flour
3/4 cup brown sugar
1/2 teaspoon ground cinnamon
1/2 teaspoon ground nutmeg
2/3 cup oil
2 lightly beaten eggs
2 cups grated carrot (~ 2 large carrots)
60g chopped walnuts


Preheat your oven to 180 degrees Celsius, and grease and line an 18cm cake tin.


Mix the dry ingredients together in a bowl. Add the oil and eggs, and beat with an electric mixer for around one minute. Stir in the carrot and chopped nuts, then spoon the batter into the prepared tin and bake for one hour.


.Remove the cake from the oven and cool it completely in the tin before turning out.


To make the cream cheese frosting (enough for the top of the cake only), beat together 60g cream cheese, 125g icing sugar and 30g butter. Add 1/2 teaspoon vanilla essence, then ice the top of the cake. This frosting is delicious, and not at all runny like the other cream cheese frostings that I have made to date.


Hope you had a great birthday guys!

Thursday, January 8, 2009

Triple Layer Pina Colada Cake


I read with shock this week that Woolworths in the UK has ceased to be as a consequence of the current economic crisis. For just under a year, I lived near Lancaster Gate tube station in London, and I relied on my local Woolworths at Marble Arch for all of my general household goods. Unlike Australia, supermarkets in the UK (at least, the ones I went to) do not sell general household items like mops and brooms, so Woolworths was my "go to" store for such things. The lovely blue stripey plates that appear on my blog came from Woolworths in Marble Arch, London. Even my copy of Crowded House's Recurring Dream came from Woolworths at Marble Arch. Accordingly, I feel a personal touch of nostalgia and sadness for the fate of Woolworths stores in the UK.

On a happier note, there have been four recent birthdays among my work colleagues. For Susie and Racquel, whose birthdays were the most recent, I turned to Sky High: Irresistable Triple Layer Cakes by Alisa Huntsman, Peter Wynne and Tina Rupp to make a cake, because Racquel had previously expressed her love of the triple-layer cake. (I've said it before and I'll say it again - this is a great book.) I chose the Pina Colada Cake for Susie and Racquel, simply because what girl doesn't like a cocktail?

The cake consists of three layers of brown sugar cake soaked with rum, a pineapple filling, and a coconut buttercream. The pineapple filling was delicious (I tasted a spoonful of it while assembling the cake), but unfortunately I cannot report on the taste of the remainder because I wasn't around when the cake was served. I only made a half recipe of pineapple filling, which seemed more than enough to me. I also substituted lemon juice for lime juice in the filling, as I couldn't find lime juice for the life of me in the City Coles, and the supermarket limes that I have experienced are usually small and dry, yielding very little juice.

Brown Sugar Cake

To make the brown sugar cake, you will need:

3 3/4 cups plain flour
1 3/4 teaspoons baking soda
1 teaspoon baking powder
pinch of salt
2 1/4 cups packed light brown sugar
230g butter, softened
1 3/4 cups buttermilk
5 eggs
2 teaspoons vanilla extract

Preheat your oven to 180 degrees Celsius. Grease and line 3 x 9 inch cake tins.

Sift the flour, baking soda, baking powder and salt together. Add the brown sugar, butter and 1 1/2 cups buttermilk, then blend together using an electric mixer on low speed. Increase the speed to medium and beat until the mixture is light and fluffy.

In a jug, whisk together the eggs, the vanilla extract and the remaining 1/4 cup of buttermilk, and add to the cake mixture in 3 batches, stirring until just combined after each addition.

Divide the cake mixture evenly between each of the 3 cake tins, and bake the cakes in the preheated oven for approximately 25 minutes. Remove the cakes from the oven and allow them to cool in the tins for 10 minutes before unmoulding onto a wire rack and allowing to cool completely.


Pineapple filling

I made a half recipe as follows:

440g tin crushed pineapple in juice
1/2 cup sugar
1/8 cup lemon juice
1 split vanilla bean

Put the pineapple (including juice), sugar and lemon juice in a large saucepan or frypan. Scrape the vanilla seeds into the pan, and add the pod. Heat the mixture over low heat, stirring until the sugar is disssolved. Turn the heat up to medium and bring the mixture to a simmer, stirring occasionally, until most of the juices have evaporated and the pineapple mixture has thickened.

Remove the pineapple mixture from the heat, remove the vanilla pod, and allow it to cool completely.


Coconut buttercream

3 egg whites
1 cup sugar
1/4 cup water
290g softened butter
2/3 cup unsweetened coconut milk (I used the light version)
1 1/2 teaspoons coconut extract

Place the egg whites into an electric mixer bowl.

Put the sugar and water into a saucepan, and stir over medium heat to dissolve the sugar. Bring the mixture to the boil, then allow it to boil without stirring until it reaches 238 degrees Farenheit on a candy thermometer. Remove the mixture from the heat.

Beat the egg whites with an electric mixer for a short time, then pour the hot sugar syrup in a slow stream into the eggwhites while still beating, and continue to beat until the meringue has cooled to room temperature.

Turning the electric mixer to low speed, beat in the butter, two tablespoons at a time, then turn up the mixer speed to medium and beat until the frosting is smooth and fluffy.

Beat in the coconut milk in several batches, then stir in the coconut extract.

Cake assembly

2/3 cup rum
shredded or dessicated coconut

Place one cake layer on a cardboard cake disk, and soak the cake with three tablespooons of rum. Spread half of the pineapple filling over the top of the cake, then place a second cake layer on top. Repeat, topping with the third cake layer, and sprinkle the top cake layer with the remaining rum.

Frost the cake with the coconut buttercream, and press the dessicated or shredded coconut onto the sides of the cake to decorate.

Although I can't tell you how the cake tastes, I can truthfully say that it smells delightful! As with all triple layer cakes, it also looks impressive, so you can wow your friends at your next dinner party.


Tuesday, January 6, 2009

Make Your Own King Cake - Galette des Rois


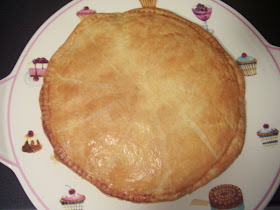
Today, 6 January, is Epiphany. To celebrate, Zorra of Kochtopf has invited us to buy or bake a King Cake and to discuss our family Epiphany tradition. Although there is no family tradition on my part, and I in fact only learned about King Cakes when I started reading food blogs, I've always wanted to make a King Cake. You can find out more about the origin of the King Cake here.

Originally, my plan was to make the yeasted American version of the King Cake, as featured at Mardi Gras in New Orleans. However, my heart was stolen by the elegant French galette des rois. Armed with home-made puff pastry from my
Essential Ingredient baking class (the last piece!), how could I resist?

I used
this recipe for the Galette Des Rois, but omitted the feve (as I don't think my colleagues would be very appreciative of it, given that King Cakes are not a tradition among any of them either, to my knowledge) .

Basically, you cut out two 9 inch rounds of puff pastry. Place one round of pastry on a silpat mat, and brush a one inch border around the edge of it with egg wash.

You make a pastry cream and an almond cream, combine them, and then pile the mixture into the centre of the puff pastry ring, inside the egg wash border:


Finally, you top the tart with the other round of puff pastry, and seal the edges together by crimping them with a fork. You carve a design in the top of the tart using a sharp knife (I used a traditional swirly design), and cut a hole in the top of the galette to let out steam during baking:


The galette is then refrigerated for half an hour before baking in a hot oven for 40 minutes. The finished result is shown in the photo at the top of this post.

This galette was really quite fun and not very hard to make. I love pastry cream, so couldn't resist licking the bowl - any excuse to make it ;).

You can check out the King Cakes and shared traditions from everyone who came to Zorra's event after 12 January at
Zorra's site.

TWD - French Pear Tart


I honestly didn't think I could make TWD this week - but given that Dorie Greenspan herself made the choice, how could I resist?

This week's dish is French Pear Tart. This is a dish that I have long admired, but have never made before.

The tart starts off with a crumbly French sweet pastry shell:

The tart shell is then filled with almond cream, and topped with poached pears which have been halved and sliced:


The tart is then baked until it is puffy and golden, as in the photo at the top of this post.

The pears are supposed to look like spokes on a wheel - hmm, my funny short pears don't quite look like that, but I still think it looks elegant. I haven't had a chance to taste it yet, but it looks and smells wonderful.

Thanks to Dorie for joining TWD this week and choosing this recipe. You can see all the other interpretations of the French pear tart by going to the TWD blogroll.

Monday, January 5, 2009

Abi's birthday - White Chocolate Mud Cake


Happy New Year to all!

My first post for this year is a "catch up" post, showing Abi's birthday cake from last December. Abi is a work colleague and friend, who requested "pink" and "chocolate" when I asked what kind of cake she wanted for her birthday.

To cover off the chocolate angle, I made the base cake for Ispahan cupcakes by Lorraine E of Not Quite Nigella:


It is a white chocolate cake with a crispy, macaron-like top, and it is absolutely delicious. However, be warned that, as a single cake, the recipe only makes a small cake. This means that you may need to multiply the recipe, depending on the size and appetites of your audience.

The icing is a thick white chocolate ganache (you can use your favourite recipe) coloured pink, then decorated with commercial red writing gel, flowers cut out from "ready to roll" fondant, baby pink edible glitter (which doesn't show up well in the photo, unfortunately) and silver cachous.

Abi was stoked with her pink girly cake - which is all that matters. Hope you had an amazing 25th birthday Abi!